
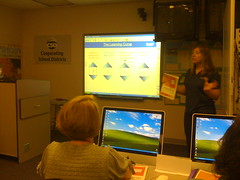
I’m attending and participating in a two day workshop at CSD in Saint Louis on SMART Notebook version 10. This post includes my notes from day 1. I’ve used SMARTboards for several years and actually use one each week (at least on Sundays) but am only scratching the surface for how the SMARTboard can be used interactively at this point. I’m enthused to attend this training even though it is very basic, not only to learn from the presenter in terms of her curriculum, style, approach, etc. but also to get more ideas for how I can use the electronic whiteboard INTERACTIVELY with students as well as teachers. My online curriculum for interactive whiteboard training is on handouts.wesfryer.com/ewhiteboards. (I haven’t updated it in quite a while, but likely will following this week’s workshop.) Karen Montgomery‘s “Think Interactive Whiteboards in the Classroom” curriculum is good to reference/use as well for IWB training. MY THOUGHTS AND REFLECTIONS ARE IN ALL CAPS.
CSD, btw, is “Cooperating School Districts” and started as a consortium of Missouri superintendents and districts purchasing pianos as a group to qualify for bulk discount pricing. CSD still has a business services division that coordinates cooperative purchasing as well as other district services related to finances/administration, but also offers a wide range of professional development learning opportunities for educators like the workshop I’m attending this week. Read more about the history of CSD on their website about page.
Note all this training is available free, online, from the SMART website in their training tutorial area.
Showed the “Medieval Book” video to get started
– opening questions
– what are connections from this situation to today?
– used name of video main character to discuss his experiences and compare them to ours today: Ansgar?
Everyone is at a different place on the learning curve
– touched the board for the first time today
– do not have a board installed
– board in classroom but have not received training
– board and training
Using voting tools from Smartboard Software
– showed way graphical elements could be moved on top of the graph
Our trainer today: Colleen Schafer from Buffalo, NY
Level 1 Objectives
– showing these by using a bar-sized spotlight tool (revealing bulleted text elements one by one)
Everyone received a “learner notebook” with all the steps and tips from today’s workshop
– it is a spiral bound, 8 1/2 x 11 book, 135 pages
USB cable connecting the SMARTboard to your computer allows you to access all programs/applications on your computer which are supported by the software from the SMARTboard
SMART’s electronic whiteboard uses “resistive technology”
– has front layer, an air gap, and a back
– when you push on the board, you are pushing on and closing the air gap
key points to remember:
– touch with intent
– apply constant pressure
– it is a durable surface
– one point of contact (not multi-touch at this point like the iPhone)
There is a “SMART table” which is multi-touch, so the possibility exists that SMARTboards can become multi-touch devices at some point with a software upgrade
SMART assistive devices
– can use a wand to pass control
– tennis balls can work great, but not to throw it
– finger puppets can work great
Tomorrow everyone will receive a USB drive
– we’ll play a game with a kush ball, and also with a fly swatter
Be very cautious around the pen tray
Can use a stickynote or a chapstick in the tray if a pen disappears
– avoid putting permanent/real markers in there, however, since they could be used accidentally by you or someone else!
Use the tray button to launch the keyboard
remember you always need to “tell the text where to go” by clicking on the board
SHE JUST SHOWED HOW TO TYPE A DIRECT URL INTO THE BROWSER (CNN.COM)
– I THINK IT’S IMPORTANT TO REMIND TEACHERS HOW BENEFICIAL IT CAN BE TO USE SHORTCUTS/BOOKMARKS INSTEAD, SINCE IT’S EASY TO MIS-TYPE A URL! 🙂
pressing and holding on the screen more more than 3 seconds will also initiative a right mouse click, just as the button on the smartboard can
When you are using the pen during the orientation process and just click on the arrow, that can be called “target shooting.” The 9 point orientation is the default, a 4 point is available along with 12 point and 20 point. For math and science teachers, we recommend the 20 point.
– great to let students help with board orientation before class begins
– to select the 20 point orientation option, open the SMARTboard control panel / “SMART Board Tools” application” (in Windows, right click the SMARTboard icon in the system tray in the lower right corner)
— then click under SMART Hardware Settings to change the default number of points for the SMART orientation
I AM VERY GLAD TO LEARN THIS. I DIDN’T KNOW THIS WAS AN AVAILABLE OPTION.
Remember you can push both buttons on the SMARTboard to launch the orientation program when your computer is connected to the board with the software running.
Question
– What presentation tool does the SMART Board begin to replace? The overhead projector.
— just as we could place a layer (transparency) over the overhead projector, we can do that with digital ink using the SMARTboard
As soon as I pick up a pen, the computer screen becomes “ink aware”
– we call this white border around the screen a “digital ink layer”
IT WOULD BE FUN TO GET PICTURES ON FLICKR OR TAKE THEM/POST THEM OF TEACHER HANDS WHICH HAVE VIS-A-VIS COLORED PEN TRAILS ON THEM AFTER WRITING ON AN OVERHEAD PROJECTOR ALL DAY. SHOWING A PHOTO LIKE THAT WOULD BE A GREAT WAY TO MAKE THE POINT THAT THE “DIGITAL INK LAYER” IS SO MUCH CLEANER THAN THE “OLD” WAY.
Use the ink layer to mark up websites, put “do now” activities on the screen / desktop
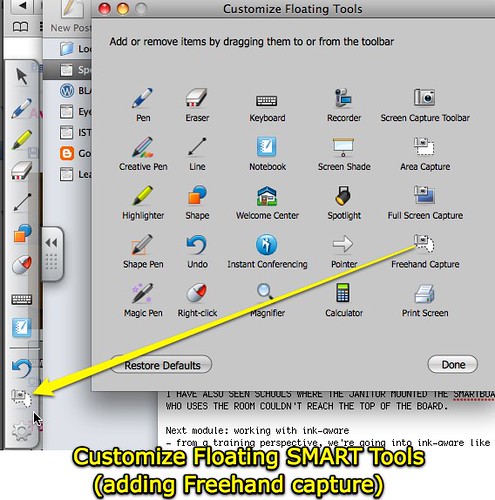
– you can clear the ink, capture it to take a picture
You can click the tool bar settings on the left sidebar of your screen, and add the “freehand capture” icon to allow quick access to the screen region capture option. You can also turn on the floating toolbar for screen capture.
Now we are shifting to a hands-on practice time, going to different parts of the building for hands-on work
Electric current creates electromagnetic interference, and people who are hard-mounting the electronic whiteboard in a classroom should follow it to the letter to make sure it works correctly.
I HAVE ALSO SEEN SCHOOLS WHERE THE JANITOR MOUNTED THE SMARTBOARD, AND THEY MOUNTED IT SO HIGH ON THE WALL THAT THE SHORT TEACHER WHO USES THE ROOM COULDN’T REACH THE TOP OF THE BOARD.
You can open
Next module: working with ink-aware
– from a training perspective, we’re going into ink-aware like a balloon effect, those teachers who want to
when you have a predominant white boarder, you are in the “ink layer”
– when you don’t see it and you’re able to mark up a document or program, you’re in an “ink aware” application
– examples: SMARTnotebook software, all of Microsoft Office apps (MS Word, Excel, PPT), OpenOffice Writer and Calc, OneNote, Visio, more…
– can write or draw directly into that active file
MS 2003 and 2007 now being used in schools
– 2003 version currently has a feature not supported for 2007: you can change the settings so ink-aware drawings are automatically inserted as images
– can turn on the ink-aware toolbar after the software is installed: in MS Word 2003 go to VIEW – TOOLBARS – SMART AWARE TOOLBARS
– in MS Word 2007 the floating toolbar comes up automatically when you pick up a pen
writing is inserted as an image into a document when it is “ink aware”
– like inserting an image as clip-art
SMART does not training on Mac ink-aware differences as part of this workshop
Encourage people to use their “best kindergarten writing” when using the handwriting recognition in “ink-aware” applications like MS Word and MS Excel
When drawing in a PPT, because it is “ink-aware” you can click on drawing and choose to “save ink notes” to SMARTnotebook or you can insert the drawing as an image
– also can insert/add a blank slide whenever you want in a PPT slideshow to use as a whiteboard page for writing
– can choose to black/unblack the screen and then write on the black screen in a high contrast color if desired
inserting lots of text you’ve written into a PPT can be converted from handwriting to text, but that is “not a predictable behavior”
THIS WORKSHOP IS ENERGIZING ME TO THINK ABOUT NEW WAYS FOR BEING MORE INTERACTIVE WITH A SMARTBOARD. OF COURSE THIS TRAINING IS ALL ABOUT OVERHEAD PROJECTOR REPLACEMENT: TEACHING WITH A SMARTBOARD INTERACTIVELY INSTEAD OF USING THE OVERHEAD
Can turn on a setting to “double-press” to advance a PPT slide
– click once and then again to the right to advance
– click once and then again to the left to go back
Can put floating toolbar during PPT and access SMART toolbar to change selected pens, select highlighter, etc.
only thing you can erase is digital ink that comes out of floating pens
– you can’t erase shapes, for example, with the eraser– you have to select those objects and then you can clear/erase them separately (just not with the eraser)
GOOD SIGNS FROM CSD TODAY!
Module 3: Basic design in SMART Notebook software
There are over 1000 known glitches in SMART Notebook software, so to address those SMART regularly releases software patches
some variants of Linux are supported by SMART for some drivers and software
Can create an interactive environment with Flash items and other items
Can toggle the Notebook toolbar from the top of the screen to the bottom
– this can make the buttons much easier to access for students and other users who are short!
You can tell the active page because it has a blue border in the right sidebar thumbnail area of SMART notebook, and it has a triangle in the upper corner of that thumbnail
– open page sorter tabs and close them using the sidebar
Some tools like windowshade and spotlight function within Notebook, but not in “ink-aware” applications like PowerPoint.
– ability to create interactive activities is SO much better and fully-featured when you work and present within SMART Notebook instead of another program like PPT
AS A PARTICIPANT IN THIS WORKSHOP, I’M STRUCK BY HOW CRITICALLY IMPORTANT THE HANDS-ON PORTIONS ARE. WE MAY THINK THE “LEARNING PORTION” OF THE WORKSHOP IS DURING THE LECTURE, BUT THAT IS ABSOLUTELY NOT TRUE. THE HANDS-ON PART IS, AT LEAST FOR ME (BUT I THINK FOR MANY OTHERS AS WELL) THE TIME WHEN THE LEARNING REALLY TAKES PLACE. I THINK I’M LEARNING SOMETHING WATCHING THE PRESENTER SHOW IT, BUT I AM REALLY NOT. WHEN I AM ON MY OWN AND TRYING TO DO SOMETHING I’VE SEEN HER DEMONSTRATE, THEN AND ONLY THEN DOES THE IDEA OR SKILL BECOME REAL FOR ME AND BECOME SOMETHING I’M LIKELY TO DO/REPEPAT/USE ON MY OWN.
I WISH I HAD TAKEN THIS TRAINING AT THE START OF THE ACADEMIC TERM THIS YEAR. I AM THINKING OF ALL THE LESSONS I’VE TAUGHT WHICH I HAVE NOT USED SOME OF THESE INTERACTIVE FEATURES, WHICH COULD HAVE MADE THE LESSON MUCH MORE FUN AND ENGAGING FOR STUDENTS…..
Now looking at the gallery tab in SMART Notebook software
IT WOULD BE GREAT TO HAVE A FLICKR CREATIVE COMMONS SEARCH OPTION HERE IN SMART NOTEBOOK, SO TEACHERS COULD SEARCH AND INSERT CC CONTENT DIRECTLY FROM THE SOFTWARE.
To insert an item from the gallery, you can double click it, drag it, or use the dropdown menu from the upper right corner
We cannot remove a background once it has been placed on a Notebook page, but we can cover it up with something else
– backgrounds in the gallery have a flipped up lower right-hand corner, clip art does not
Gallery items include interactive flash items
I AM WONDERING WHERE ONLINE YOU CAN FIND OTHER TYPES OF INTERACTIVE FLASH OBJECTS, IN ADDITION TO THOSE INCLUDED HERE IN THE SMART GALLERY, WHICH CAN BE INSERTED AND USED? THESE ARE THE TYPES OF LESSON OBJECTS THAT I WANT TO KNOW MORE ABOUT AND UTILIZE MORE IN LESSONS.
You can download (for free) the SMART Lesson Activity Toolkit for more interactive objects
– One of the included objects is a checker board, so users can actually play checkers on the SMARTboard
How can we update “Essentials for Educators” to get more
– click on the “gallery actions icon” (the gold colored wrench in the upper right corner of the gallery) and choose check for updates:

When working with the gallery in Notebook, as a technique resize both vertically and horizontally when you search
Quick Gallery items overview
– basic calculator
– clock
– dice
– stopwatch
– random number generator
– adding sounds for interactivity and classroom management
you can reprogram the text on different sides of the dice (choose “Dice – keyboard” from the gallery)
– play a sound from an instrument
Text splitter tool
– drag typed text into the box, and you can drag out words or letters so they become independent objects in Notebook
– great for practicing spelling
Fridge magnets
– great as sponge activities, spelling words, vocabulary words, review concepts
Spinner tool: can be edited so it has up to 12 selections
My Content
– the only place where you can add your own items (can’t add things to SMART-created packages)
I FEEL SO SILLY THAT I HAVE STRUGGLED IN THE PAST WITH TRYING TO USE WEB-BASED OR WIDGET-BASED TIMERS DURING WORKSHOPS, WHEN THESE GREAT WIDGET TIMERS ARE AVAILABLE RIGHT WITHIN THE SMART NOTEBOOK SOFTWARE.
As a technique I can use the sticky note flash tool, put text in, and resize it smaller so when it is needed you can make it larger to show it
when you search in the SMART Notebook gallery, as a technique use singular forms of words rather than plural forms for better search results
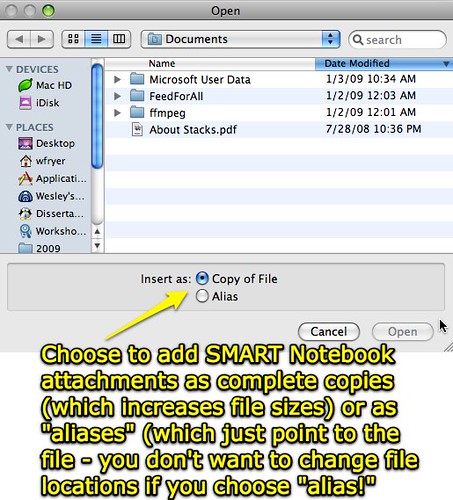
Use the Attachments tab to insert all the supporting documents you will use in your presentation
– you can do this as actually importing the docouments (which increases the file size) or by using relative paths to the documents
– can add URLs too
– Mac version asks if you want to insert as a copy or an alias
– the attachments feature is a big reason to use Notebook software instead of PPT (SMART training is “pro-choice” however, so both options are shown, teachers decide which to use)
Sharing a notebook file
– content can go between PPT and NB (notebook)
what do we call items when we bring them from foreign countries: Imports!
– same language here, imports and exports from FILE menu
– can also import Promethean files!
I AM THINKING OF THE VALUE OF JUST USING THE LINE TOOL TO CREATE BASIC TIMELINES, AND HAVING STUDENTS RE-ORDER OBJECTS ON THE SCREEN IN THE CORRECT ORDER.
I LIKE HOW OUR HANDOUT IS CALLED A “LEARNER WORKBOOK.” THIS MAKES THE DOCUMENT APPLICABLE TO ANYONE, WHETHER OR NOT YOU ARE A TEACHER, LIBRARIAN, ADMINISTRATOR, STUDENT, PARENT, ETC. IN THE WORKSHOP
It is usually good to not use font sizes smaller than 28 point in Notebook documents, for visibility
Great thing about working in a digital Notebook file, you will never run out of room or space!
– important to work in clean workspaces
Technique: use layers to cover up answers with pictures
– type text first as lower layers
– add pictures on top, can include the question or prompt in text on top of the object or photo
MY QUESTION: ARE ANY TEXTBOOK COMPANIES CREATING THEIR ENTIRE CURRICULUM IN A SMART NOTEBOOK FILE FORMAT? I SUSPECT THE ANSWER IS NOW, THERE ARE SOME SCHOOL DISTRICTS CREATING THESE TYPES OF MATERIALS, BUT I HAVEN’T SEEN / HEARD OF A TEXTBOOK COMPANY DOING THIS. THIS IS REALLY ESSENTIAL, SINCE TEACHERS DON’T HAVE TIME TO CREATE HIGH QUALITY NOTEBOOK CURRICULUM MATERIALS FOR EVERY LESSON OF THE YEAR, EVERY DAY. CEV MULTIMEDIA IS A COMPANY BASED IN LUBBOCK, TEXAS, WITH WHICH I HAVE SOME FAMILIARITY, AND THEY CREATE PPT DOCUMENTS FOR THEIR CURRICULUM TO PROVIDE THEM FOR TEACHER USE. I’D LIKE TO KNOW ABOUT OTHER COMPANIES WHICH ARE DOING THIS, AND SPECIFICALLY CREATING CURRICULUM MATERIALS FOR EITHER SMART OR PROMETHEAN IWBs.
Examples of using the magnifying glass to reveal items on the Notebook page
– don’t group items you want to show and hide, because in grouping them you put the objects on the same layer. The objects need to be on different layers. The object should be in the back, the text should be in the middle, and the magnifying glass should be in the front.
– you need to create a white circle and group it with the magnifying glass to do this on a white background. Then save that item to your “My Content” gallery
I CAN SEE HOW, JUST LIKE WITH PPT, EDUCATORS CAN WASTE A LOT OF TIME CREATING HIDE/SHOW ACTIVITIES LIKE THIS. SOME OF THESE “REVEALERS” COULD BE ENTRALLING TO USE WITH DIRECT INSTRUCTION, BUT I WOULD CERTAINLY PREFER TO HAVE ACTIVITIES LIKE THIS PROVIDED FOR ME AS A DOWNLOADABLE NOTEBOOK FILE, AND THEN JUST MAKE MODIFICATIONS TO THEM AS NEEDED LIKE YOU CAN DO WITH A FLASH-BASED INTERACTIVE TOOL.
Setting up links
– first create and bring in an object to the Notebook software
– click on the object and select LINK from the popup menu in the upper right corner
I THINK CREATING AND USING CURRICULUM LIKE THIS IN SMART NOTEBOOK CAN BE GREAT, BUT I DON’T THINK TEACHERS SHOULD BE CREATING THE BULK OF IT. I THINK STUDENTS SHOULD BE CREATING IT, AND SHARING / PRESENTING IT.
The section of the learner workbook which begins on p 85, “Creating interactive lesson activities,” includes techniques and ideas for creating reveal activities, drag and drop ID label activities, magic pen zoom, infinite cloner activities, and more.
– THIS LOOKS LIKE ONE OF THE MOST IMPORTANT PIECES OF TODAY’S WORKSHOP! I WOULD LIKE TO CREATE AN DESIGN AN ACTIVITY USING THESE METHODS FOR EACH OF THE LESSONS I’M TEACHING IN SUNDAY SCHOOL. LEARNING ABOUT THIS ACTUALLY MAKES ME REGRET WE ONLY HAVE ABOUT 3 MORE WEEKS TO MEET…..
Technorati Tags:
smart, smartboard, training, missouri, csd, stlouis, saintlouis
If you enjoyed this post and found it useful, subscribe to Wes’ free newsletter. Check out Wes’ video tutorial library, “Playing with Media.” Information about more ways to learn with Dr. Wesley Fryer are available on wesfryer.com/after.
On this day..
- Using Jamboard in a Remote Learning Lesson – 2020
- Best Stylus for iPad Drawing and Sketchnoting – 2016
- Cool Stuff Rachel & I Learned in Minecraft This Weekend – 2014
- Additional Books to Read on the POW/MIA Situation in Southeast Asia – 2012
- Connect your laptop to a TV – 2011
- Music by Yukon, Oklahoma students aboard the John Lennon Educational Tour Bus – 2010
- Apple laptop battery cycle charges and warranty coverage – 2010
- Always moderate membership in educational networking sites – 2010
- AT&T billing finally figured out I don’t work for them anymore – 2009
- Sharing Google Reader feeds by tag and reflections on information flow management – 2008
Comments
2 responses to “Day 1 of SMART Notebook training at CSD”
Great summary – thanks! I’ve used SMART before, but haven’t found all the ways it can/will work with what I do in the classroom. Keep sharing and I’ll explore some of the options 🙂
Thanks! Very good coverage of CSD here.