
(Cross-posted to “Instructional FAQs for Yukon Public Schools” and PlayingWithMedia.com)
Photos can be added to blog posts in different ways. In this post I’ll explain how to add a photo as a linked image on a free (and ad-free) KidBlog.org site.
To reduce the amount of time students spend (and possibly waste) searching for Internet images to use in a blog post or other digital project, it’s a good idea to have them find and identify their photos before class. These image links can be saved in student email, as comments to a blog post, in a Google Document, or in another way.
By creating a photo gallery of images using a free web service like Picasa or Posterous, a teacher can create a designed place / website for students to obtain their images for a project. Students can link to this photo gallery site from the teacher’s homepage, and/or a direct link to the photo gallery can be created on student desktops or a screen of the iPad / tablet device students use.
I recommend both teachers and students use the free Chrome web browser from Google for these steps. Chrome is the fastest web browser on both Windows and Macintosh computers, and also has helpful features (like a “copy URL” option when right clicking / control clicking images) which is very helpful for these steps.
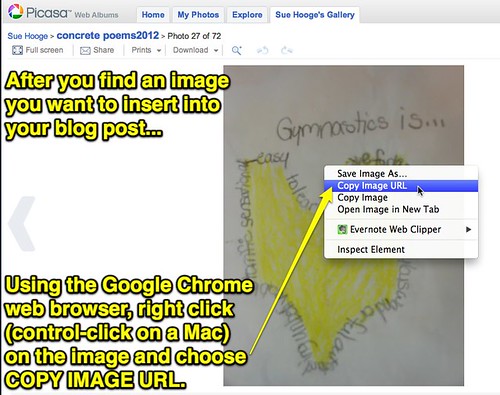
STEP 1: Copy the Image URL
The first step is to find the image you want to insert into your blog post and copy the direct URL or link to the image. In Chrome, do this by right clicking (control-clicking on a Mac) and choosing COPY IMAGE URL.
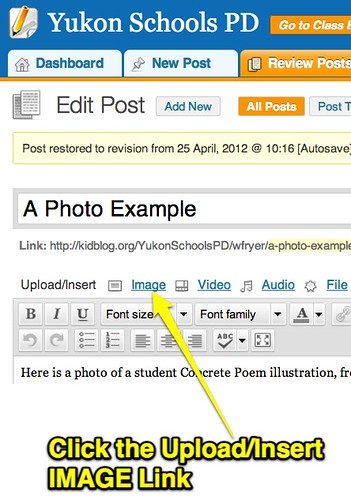
STEP 2: Click Insert Image
Press enter or return to create a blank line where you want to insert the image. Then click the INSERT IMAGE button above the post format tools.
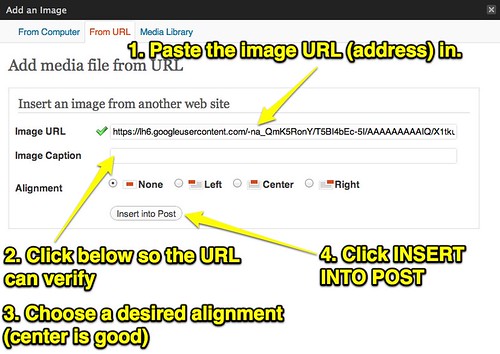
STEP 3: Paste the Image URL
Click in the field next to image URL and paste the full link address you copied in step 1. Click below it so KidBlog can “verify” the link works. If desired, choose an alignment option. Click INSERT INTO POST.
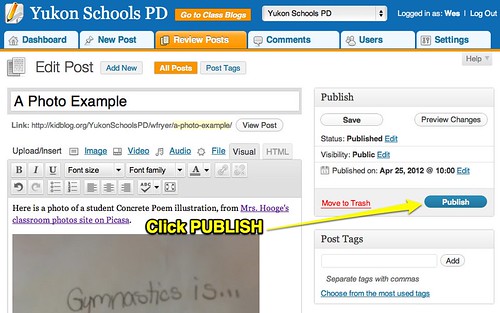
STEP 4: Publish
Add additional text as desired to your post, along with additional images. When finished, click PUBLISH.
It is a good idea to give attribution credit to the original source of the image you are linking by including a direct link to the source website at the bottom of your post. Image websites like Wylio create attribution links right below images using Creative Commons license terms. If you want to create a properly formatted image citation, consider using a free web tool like Bibme.org. At a minimum, include the direct link to the original website at the bottom of your post to give credit to the original source website. It is better from a copyright perspective to use this technique of direct linking / embedding images you use in blog posts rather than downloading and re-uploading a copy of an image to your original website. With the method described in this blog post, you are NOT making an actual copy of an image when including it in a blog post. Not all websites permit images to be embedded in this way. School librarian Joyce Valenza has a good list of copyright-friendly image sites to use.