This afternoon I decided to try a new “app smash” workflow and create an enhanced version of a recorded iPad video from Friday’s OMLEA conference in Tulsa, Oklahoma. This revised version of the video includes the slides I showed on the screen during my “OklaEd talk,” and also includes an enhanced audio track.
While it might have been possible to entirely create this on my iPad, I found it faster to use my laptop as well as my iPad in this workflow. To create this:
- I saved my Haiku Deck presentation as a PowerPoint file on my laptop.
- I saved each PowerPoint slide as a JPG image.
- I used Air Drop to copy the images from my laptop to my iPad Photo Roll, and put them into a separate iPad photo album.
- I used Peggo.co to download a 256 Kbps mp3 audio version of the presentation video from YouTube.
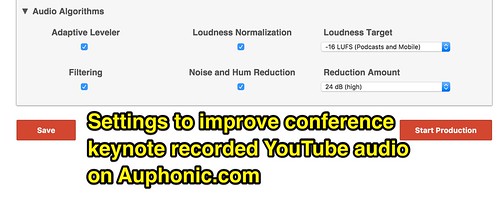
- I uploaded that audio file to Auphonic.com, and chose to use the adaptive leveler, loudness normalization, noise and hum reduction, and other filters. (Specific settings are included in this screenshot, also embedded below.)
- I used Air Drop to copy the normalized/improved mp3 audio file to my iPad and opened it in the Voice Record Pro app.
- I saved a plain white image I found on Google Images to my iPad camera roll, so I could use it as a background for the video I would create using Voice Record Pro.
- In Voice Record Pro, I saved the normalized/improved audio recording as a video to the camera roll using the white background image.
- I opened the Green Screen by Do Ink app on my iPad and created a new project.
- I imported the video file including the normalized/improved audio as the bottom layer in the Green Screen app.
- I imported my first presentation slide as the middle or second layer in the Green Screen app.
- I imported, cropped, resized and moved the video of my presentation recording as the TOP layer in the Green Screen app. I also muted the clip, since I only wanted to play the audio from the normalized/improved version in the bottom layer.
- I repeated step #11 each time I transitioned to a new slide during the presentation video. This produced a “synchronized” final video. I used 13 slides in the presentation, so I repeated this step 13 times.
- I exported / SAVED the final video from the Green Screen app to my iPad Camera Roll at 720p.
- I uploaded the final video to YouTube with the free YouTube capture app.
This process involved a lot of steps, and I might not have wanted to do it for a 45 minute or longer presentation. For a 12.5 minute presentation it seemed reasonable, however, and definitely worth the effort. It might have been possible to make this in iMovie for iPad using the “picture in picture” feature, but based on my prior experiences I don’t think it would have allowed for as much flexibility and customization as I was able to achieve using the Green Screen by Do Ink app.
For more details about this and the other three presentations I shared at OMLEA in Tulsa on Friday, see my post, “Presentations on Creativity, 3D Printing, Digital Sharing and More.”
If you enjoyed this post and found it useful, subscribe to Wes’ free newsletter. Check out Wes’ video tutorial library, “Playing with Media.” Information about more ways to learn with Dr. Wesley Fryer are available on wesfryer.com/after.
On this day..
- 10 Days till EdCampOKC 2017: March 4, 2017 at Del City High School – 2017
- Presentations on Creativity, 3D Printing, Digital Sharing and More – 2016
- Audio Podcasting with iOS and YouTube – 2015
- Sleet Sledding: The Movie (fun with iMovie for iPhone Trailers) – 2013
- Narrate a SlideShow with ShowMe – 2012
- Create a Narrated Slideshow with ShowMe for iPad – 2012
- Marzano Causal Teacher Evaluation Model by Robert La Grassa – 2012
- Lessons Learned from Finger Puppet Theater on Vimeo – 2011
- 5th Grade Colonial Living History Museum – 2011
- Green Screen Effects in iMovie 09 – 2010


