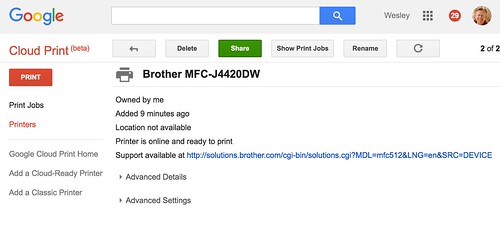
The Brother MFC-J4420DW printer at our house actually IS working with Google Cloud Print now, but I had to make some changes to its setup today and thought I’d write a quick post to share what I learned. We’ve had this printer about 8 months now, and overall it’s been fantastic. We can wirelessly print at home from our varied collection of MacBook laptops, Chromebooks, iPhones and iPads. That is because this specific printer supports both Google Cloud Print and AirPrint. I purchased the printer at a local Staples store at the start of the school year for about $175, because we really needed a home printer that would let my wife print directly from her Chromebook laptop. When I was shopping for the printer, I specifically asked for a model that supports both Google Cloud Print and AirPrint.
Proof of how we’ve been pleased with this printer came last week around midnight on Wednesday night, when our 10th grade daughter spontaneously said, “I’m so glad we have a good printer this year.” Reliability is important with three children and two educators in the house who frequently print items that are due/needed the next day, and the Brother MFC-J4420DW printer has rarely let us down. That said, however, the Google Cloud Print settings have been a bit tricky and required our official family IT support guy (that would be me) to figure several things out with the help of Google that weren’t immediately apparent using the documentation which originally came with the printer.
Here are the most important things I’ve learned about keeping our Brother Google Cloud Print-ready printer working and our family users happy:
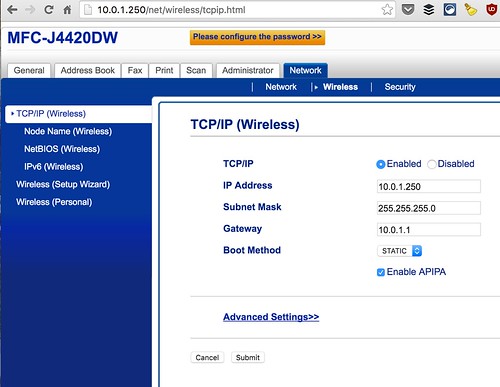
Give the printer a static IP address
Your home router gives every Internet-connected device which connects to it an IP address. Usually these addresses are automatically created and shared and users don’t have to worry about them. When it comes to printing and Google Cloud Print, however, a static IP address is needed. This is because when the printer restarts or your home Internet router restarts, it periodically can change the IP address given to different connected devices. This can “break” your Google Cloud Print sharing setup. Of course this may change at some point as the Google Cloud Print protocol continues to improve along with other printers, but at this point a static IP address has been needed for our setup.
This Brother support article describes how to configureBrother MFC-J4420DW printer with a static IP address. We don’t have Windows computers at home, just Macs and Chromebooks, so I didn’t use these precise instructions to configure ours. I downloaded the Mac software for our Brother printer, which supports our specific operating system version, using their support site. It is a wizard-based software program which requires that you plug in via USB to the printer for the initial setup.
After the printer is initially setup, you can alternatively connect to the available settings using the printer’s IP address. I find this browser-based printer configuration option preferable. It does not require that you find and use a USB printer cable, and it’s just faster. It might be possible to bypass the downloadable printer software altogether and configure everything via the browser-based IP interface, but I’m not sure. You have to get your printer to connect to your home wireless network FIRST, using your wifi router password, and that is probably easiest using the manufacturer-provided software.
If you haven’t assigned a static IP address to any devices on your home network previously, you may be unsure what number to use. In the network settings for your computer, you can view the current IP address of your laptop or other device. Local IP addresses start with either 192. or 10. This can be configured using your home router’s setup software or browser-based administration interface. In our case at home, we use an Apple Time Capsule Router and I set our IP range to start with 10. Devices on our network have local IP addresses like 10.0.1.2, 10.0.2.3, 10.0.2.4, etc. The IP address includes four different numbers, separated by decimals. The last number can be as high as 255. While we have a lot of devices connecting to our home network, we don’t have over 100 yet! So by assigning the printer the address 10.0.1.250, I’m very confident that won’t be an address our router will try to assign.
You will keep the subnet mask and gateway setting for your printer the same as they were for the dynamically / automatically assigned settings it should already have.
Instead of manually setting the IP address of your printer using the available configuration utilities, it’s also possible to enter a “DHCP reservation” into the settings of your home router. To do this, you need to find out the “MAC address” of your printer. In this case, “MAC” doesn’t refer to Mac or Apple computers, instead it refers to “machine access code.” This article from MacObserver is a little dated, so the screens on the AirPort Utility program will likely be a little different, but it explains how to setup a DHCP reservation once you have your printer’s MAC address. This 3.5 minute tutorial video also explains why, using the Windows version of AirPort Utility.
https://www.youtube.com/watch?v=APUNOqzo29c
By having a DHCP reservation setup on your router, every time you restart your printer it should automatically be assigned the same static IP address.
Using either of these methods, you can setup your printer so its IP address won’t change. Until I made this change to our home printer setup a few months ago, family members kept losing the ability to use Google Cloud print. This required re-registration of the printer with Google Cloud Print.
Register Google Cloud Print by IP Address
As with many computing tasks, there is more than one way to register and setup a Google Cloud Print ready printer. Google’s instructions will lead you to the SETTINGS option within the Chrome Browser. After you click ADVANCED you’ll see Google Cloud Print options, and can choose to MANAGE your printers. You also should see locally available printers, and if you haven’t setup your Cloud-Ready printer previously (or it’s been unregistered) it should have a REGISTER button next to it.
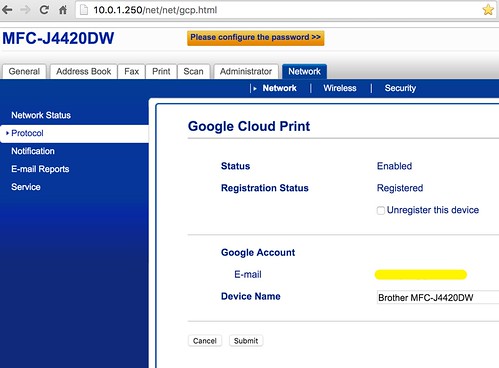
For some reason, I’ve had trouble registering our Brother printer using that option. Instead, I’ve gotten it to work by using the IP-based browser interface. Find the Google Cloud Print menu, and REGISTER option, by navigating to the NETWORK tab, then clicking PROTOCOL in the left sidebar, and clicking ADVANCED OPTIONS next to Google Cloud Print.
When I clicked to register our Brother printer in THIS interface, and was prompted with a menu to click OK/ACCEPT on the printer, the printer immediately showed that popup menu. Using the Google Chrome Settings Register option, it never would popup to confirm the setup.
Verify Printer Date and Time
At some point in the last few weeks, our Google Cloud Printer setup went stale and reported its status as OFFLINE. I’m not sure the exact reason, but suspect that we’d powered the printer on and off. For some reason, this caused it to lose its date and time settings. Today to get it setup again, I had to change the date/time settings on the printer using the IP address-based browser interface. I think this is under the GENERAL tab.
Before I fixed the date and time, it showed a date that was a year old and a random time. This won’t work for Google Cloud print, since it keeps a cloud-based log of all print jobs users have sent, and these need to have the correct dates and times. With the wrong time on the printer, it wouldn’t register to setup as a Google Cloud Print printer.
After setting the date and time correctly, however, the Google Cloud Print registration process (using the printer’s IP address and the menu settings previously described) worked like a charm. Lesson learned: If your Google Cloud Printer is offline, verify the date and time settings are set properly.
Conclusions
Overall I’m very pleased with our Brother MFC-J4420DW printer at home. Google Cloud Print is an excellent service, and can make life wonderful if you have Chromebook users at home. Each user does need their own Google account to use Google Cloud Print, however, but that isn’t a problem if you’re using Chromebooks… since Chromebooks require Google accounts to login unless the GUEST account is used.
If the information I’ve shared in this post is helpful to you, please let me know by sharing a Twitter reply to @wfryer or leaving a comment. Happy Google Cloud printing!


