Would you like to automatically backup all your important computer files to the cloud? Do you use Google Drive? In this post, I’ll share some helpful tips for setting up a “cloud folder” and a “local sync folder” using Google Drive, which you can use to backup your local files but avoid filling up your local hard drive with a variety of files which you’ve previously saved online to Google. Hat tip to Henry Finch of Holland Hall (@hollandhall) for sharing these. If you work for a school using Gsuite (formerly GAFE: Google Apps for Education) you have an unlimited amount of available Google Drive cloud storage. If not, be aware free Google accounts have 15 GB of free storage, and additional storage is available for monthly fees.
Before reviewing these steps, let’s consider some reasons WHY you might not want to sync your entire Google Drive account locally onto your laptop or desktop computer.
- Wasted Space: Your files are already being backed up by Google if they are saved on Drive. You likely don’t need a redundant copy of many old files you won’t use again on your local computer.
- Limited Space: If you’ve upgraded a spinning / traditional hard drive with a solid state drive (SSD) you may not have enough local drive storage to download and sync your entire Google Drive.
- Bandwidth: If you have multiple gigabytes of data saved to Google Drive, it can take quite a bit of Internet bandwidth to download everything to your local computer. If you’re at school and everyone is syncing large Google Drive accounts, this can slow the network down considerably and unnecessarily.
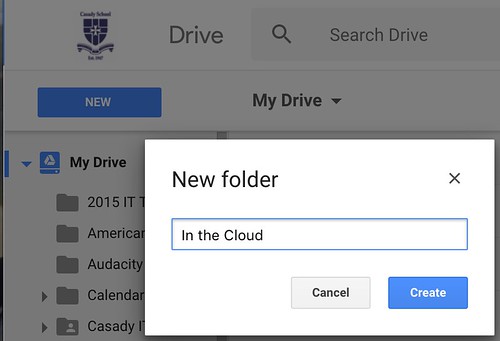
Step 1: Create an “In the Cloud” Folder
The first thing you want to do, preferably in the Google Chrome web browser, is create a new folder at the root / base level of your Google Drive folder. I named mine “In the Cloud.” This folder will contain all your existing Google Drive documents and files, once we move them into the folder in step 2.
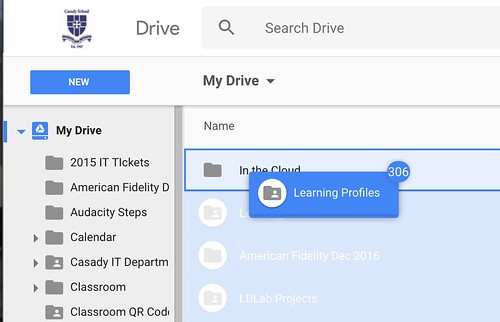
Step 2: Move All Existing Drive Files Into Your New Folder
Next, select every file (except the new folder you just created) using the Chrome web browser. Do this by clicking on the first item below the new folder you just created which should be at the top of the list (if you’re viewing RECENT files by selecting that filter in the left sidebar menu) and holding down the SHIFT key. Then scroll down the files in the menu, until the last one is shown. Then click on it, still holding down SHIFT. This will select every file between the first one you clicked and the last. Then, drag one of the files into your new folder, “In the Cloud.” All your files should then move into that folder.
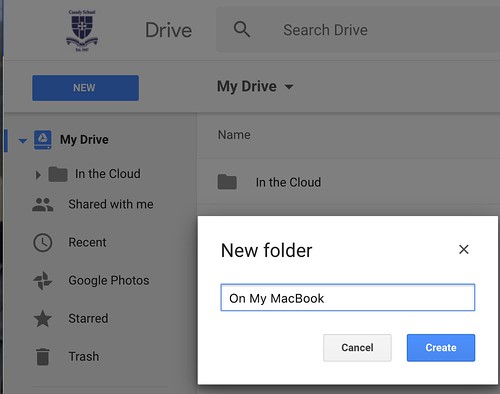
Step 3: Create a Local Sync Folder in Google Drive
Next you will create a second new folder at the root / base level of your Google Drive folder. I named mine “On My MacBook.” This is the folder which will become your local sync folder, and the ONLY folder on your local computer which will sync with Google Drive. Create this first, however, in the Cloud using Google Chrome.
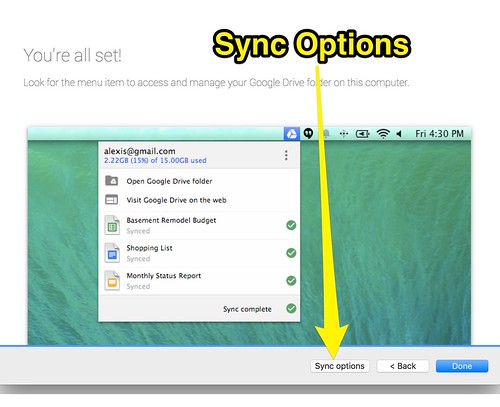
Step 4: Install the Google Drive Application and Click Sync Options
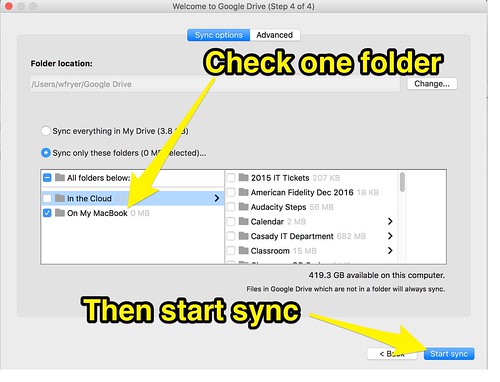
To sync local computer files automatically with Google Drive, you’ll need to download and install the free Google Drive application for Mac OS or Windows. After you install and run it, click the SYNC OPTIONS button. This is a critical step! If you don’t set sync options, the Google Drive application will start syncing ALL your Google Drive documents on your local computer, and the entire purpose of this process is to AVOID a bulk sync of everything!
Step 5: Select Your Local Sync Folder and Start the File Sync Process
In the next menu for sync options, choose “Sync only these folders” and then click the folder you created to be your local sync folder. In my case, this is the “On My MacBook” folder. Then click START SYNC.
Step 6: Move Local Files into Your Local Sync Folder
Finally, you’ll want to move your local files into the local sync folder which will be automatically created on your hard drive or SSD by the Google Drive application. On a Mac, this folder will be located on your local drive in your home directory, in the Google Drive folder. The Google Drive folder is created automatically when you install and configure the Google Drive application.
If you like saving files to your desktop, you can streamline the process of moving from the desktop to your local sync folder in the Google Drive folder. Do this by creating a file alias (in Windows, it’s called a “shortcut”) to your local sync folder and placing it on your desktop. Then when you browse into that alias or shortcut, you’ll actually be inside your local Google Drive sync folder.
Happy Syncing!
It’s a wonderful thing to have confidence that all your important files are safely and securely backed up into the cloud. Laptops can be stolen or damaged, and computer systems can be hacked or crash/fail in a way that render files unrecoverable. Backups are essential. Fortunately, especially for Gsuite / GAFE schools, Google Drive sync can make the backup process a continuous and automatic process. Hopefully these tips will help you and others at your school setup Google Drive sync with settings which conserve local drive space as well as bandwidth.
If these steps are helpful to you, please reach out to me on Twitter (@wfryer) or let me know with a comment below. Thanks again to Henry Finch for sharing these tips!

