
I learned the following trick today from Maria Henderson in a presentation she shared in Oklahoma City at an Apple event. I included this in my notes from her session, “Learning with Apple: New Content, New Connections, New Communities,” but thought I’d share this again in a separate post for those who didn’t see it in the longer one. This is a great digital magic trick!
For any student having trouble reading material on a screen, text-to-speech technologies can be wonderful. My March 2008 post, “Converting text to and from speech for accessibility and convenience” addressed some of the software options available today for text to speech functionality. Of those, “CLiCk, Speak” is probably the main one to check out. It’s cross-platform, works in the FireFox browser as a plug-in, and is free.
In addition to those text-to-speech options, the latest version of the Macintosh operating system (OS 10.6 “Snow Leopard”) includes the built-in ability to convert highlighted text in many applications into an audio file. Here is an example of a file I created while writing this post, of this paragraph.
To create the above recording in iTunes, I simply highlighted the previous paragraph, control clicked it to reveal the contextual menu, and chose “Add to iTunes as a Spoken Track.” Mac OS 10.6 creates this as an AAC file, not an mp3 file, so I did have to convert it (again using iTunes) to make the mp3 file which is embedded above.
Here are the steps you need to follow to enable this functionality on a Mac computer running OS 10.6 Snow Leopard.
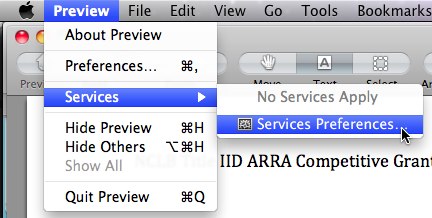
In your active application or in the Finder, select SERVICES – SERVICES PREFERENCES
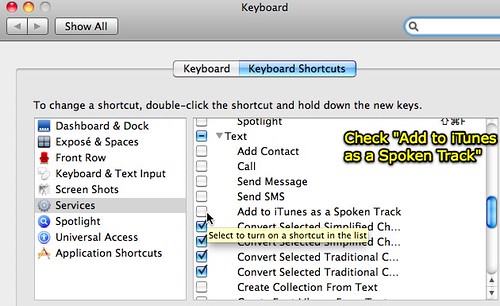
Then under TEXT click the checkbox for ADD TO ITUNES AS A SPOKEN PODCAST
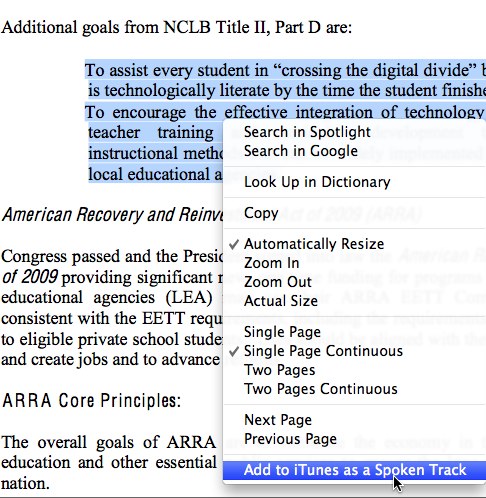
Now that you have the preference setting changed, in the Preview application you can highlight text, control click it, and choose ADD TO ITUNES AS A SPOKEN PODCAST:
This is a really great trick! Many thanks to Maria for showing this to us during her presentation. Yet another example of the multimedia power of Apple computers!
If you’re interested in learning how I embedded the above mp3 audio file into this blog post, read “Embedding mp3 audio files with a free flash player in Moodle, a wiki or a blog” from September 2008. That’s the code I used after uploading my mp3 file from iTunes to my web host using CyberDuck.
Technorati Tags:
accessibility, apple, audio, convert, leopard, mac, osx, snow, speech, text, to
Comments
5 responses to “Make any text into a computer-generated audio file with Snow Leopard”
This is such an amazing idea. Our tech teacher introduced us to this wonderful tool last year and I loved it. I thought it could be used as a neat little trick to make art projects and literacy join in a harmoneous collage.
But wow! What an excellent idea! Using the program to generate a speech into really a graph gives a perfect image for students to evaluate and discuss. I always try to show students primary sources, but they can often be long and dull. This is an excellent way to make even the longest of long speeches into a quick and simple discussion that readers of all levels would be able to understand.
Hi, great tip but I have tried this as per your instructions on the blog but the option to add to itunes does not come up on the ctrl click menu for me. I am opening documents / webpages and highlighting the text and then expecting the itunes option to come up, but it does not.
Maybe I am doing something wrong? I’m not sure. Can you clarify the steps and help further please as I may have missed something?
Many thanks
AL
It sounds more natural than other text-to-speech programs I have heard. If you don’t have Snow Leopard or a Mac, I would suggest checking out a free site called VozMe.com. I believe it also converts the text into an MP3 file. Thanks Wesley!
AL: Did you go into services in your system preferences and click the checkbox to enable this option? It won’t show up in the contextual menu until you do this. Also, what program are doing this in? Try it in Preview or TextEdit. It works in other programs but may not work in all – I know for sure it works in Preview and TextEdit.
Great tip, Wes! Thanks for sharing! And AL — I don’t think it works in a browser, but it should work in other Apple-native programs, like Wes said. It worked fabulously for me in Preview.