It’s important to obtain parent and student permission before publishing photos or videos online. Of the 610 fourth and fifth graders currently at my elementary school, only 10 parents have requested that their child’s photo NOT be published online. Our secretary is able to run a report directly from PowerSchool and provide that list to teachers. At my wife’ school, they call students who cannot be photographed for online publication “redshirt” students. We both try our best not to photograph or share photos of those students.
Despite our best efforts, sometimes a student who shouldn’t get photographed gets in a picture or video. If it’s a photo, in the past I’ve either deleted the picture or used the free iOS app “TouchBlur” to blur that student’s face if they were in a group shot. Here’s an example of a photo like that from my class last year, when students participated in a “cantilever span” building challenge idea I copied from Brian Crosby.
Today my wife realized a video she’d recently taken of students showing off the “Jitterbug Robots” they had built included a brief view of a “redshirt” student. The videos are SO great I didn’t want her to have to take the entire thing offline, so I searched and found five different iPad apps which are touted to support video blurring. Here’s the summary of what I found for these apps, along with my recommendations.
The best app I found and the one we ended up using to fix/selectively blur her student video was “Video Toolbox – Video Editing Tools All In One by YU BO.” It’s free to download, but to export/save a video you edit you must buy a $3 in-app purchase option. The app offers four different blurring options. I liked the second one the best, which looks the most pixelated. At the 13 second point of this 52 second video, the redshirt student’s face is blurred/obscured from view so you can’t see it.
Based on the apps I tested today, Video Toolbox is the best iPad option for blurring student faces in situations like this. Beware that you can’t move the blurred / pixelated area once you’ve selected it, so you might want to use iMovie or another app to export a separate clip of just the part you need to obscure. This isn’t a perfect solution but it worked for us today. Hopefully even better apps will be developed in the future with this functionality.
TiltShift Video is a $5 iPad app and is the slickest / most professional of the apps I tried today, but unfortunately it’s “blurring” functionality is designed to blur background elements to bring viewers attention sharply into focus on the main subject. It doesn’t work to blur just one person’s face, even though several different options are available for blur selection areas.
3. fameLess – Video Face Blurring
Based on the name, you’d think the free app fameLess – Video Face Blurring would be perfect for the situation described in this post when a teacher needs to blur a student face in a video. Unfortunately, this app should be renamed the “Minecraft Effect” app or the “Blockhead Effect” app, because it really doesn’t blur anything. Instead, it auto-detects what it guesses is the primary subject in a video clip and inserts a colored box over the face. I created a combined, 30 second video after I conducted my different app tests this morning, showing the output (in this order) of the apps fameLess, TiltShift Video, and Video Toolbox. If fameLess gets updated it might be worthwhile, but even though it’s free I don’t think it’s worth using or including in your student iPad apps.
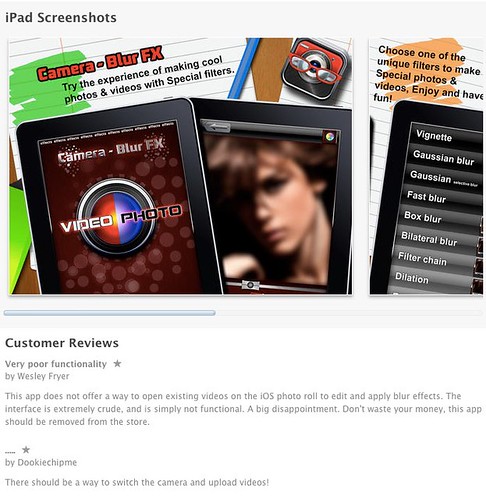
4. Camera Blur FX HD
The worst decision I made as I downloaded and tested these apps today was actually purchasing the $2 app “Camera Blur FX HD by Kevin Dermokil.” The only App Store review was negative, and I didn’t find any endorsements of the app online. I found it via an App Store search. The app is TERRIBLE and doesn’t even allow you to load videos previously recorded and saved to the camera roll. It only allows you to record videos with the app and then blur them. Documentation was minimal and the controls were very crude. I wish I hadn’t bought this app, it’s essentially worthless. I wrote an app review which will hopefully help others steer clear of this and avoid wasting $2 as I did giving it a try.
5. Photo Editor and Movie Maker Pro
The last app I found in my search for “video blurring apps” was Photo Editor and Movie Maker Pro by Alex Appadurai. It costs $2, but I decided not to buy it because the “developer website” was not informative and appeared to be a placeholder site created by non-English speakers in India. The app also didn’t appear to provide a way to blur videos, it only blurred photos. This was not clear from either the App Store description or the developer website, however. It didn’t have any ratings or reviews, either, which is generally a negative sign. After getting burned purchasing Camera Blur FX HD, I skipped this app and didn’t test it.
That summarizes what I learned today about video blurring apps. This kind of post-production media editing is sometimes called “selective blur.” It’s important to find and use the correct terminology when searching for an app like this with specific functionality. If you have used and know of a better iOS app for video blurring / selective blur of subjects, please let me know via a comment or tweet reply to @wfryer. For now, I’ll stick with Video Toolbox and TiltShift Video as my video blurring apps of choice, depending on whether I want to blur a primary subject’s face or the background for an artistic effect.


