
In the months ahead, I’m expecting to setup several different websites that will be used for educational networking / social networking using WordPress and the Buddypress plugin. I’ve been using WordPress since 2005, but need to get up to speed on Buddypress. Because I’m not going to pay to continue my Digital Dialog Ning, and I need a “sandbox” to see how user migration, site design and site management will work under Buddypress, I’m setting up a new “Digital Dialog” learning community as a subdomain of my Speed of Creativity website. In this post I’m going to share the steps for doing this with a commercial webhost.
If you’re not wanting to mess with the headaches and geek requirements which come with a self-hosted WordPress account, you can obtain a free or commercial WordPress account over at EduBlogs (if you’re an educator) or WordPress.com. There are some limits to the configuration options you have with these hosts, but there are FAR fewer headaches and still a great deal of customizability available. I haven’t tried, but I doubt either Edublogs or WordPress.com will let you install Buddypress, since this converts your installation into a full-fledged social networking site.
While it IS possible to use Fantastico within CPanel to setup a CMS like WordPress, I have read elsewhere that the security settings Fantastico uses by default are not as secure as what you can setup yourself, so it’s not recommended for a “production server” you’re going to use and have others use “for real.” In this post I’ll show a more manual process for setting up the MySQL database and user for this installation, rather than Fantastico. I’m under the impression this leads to a more secure installation, assuming you choose secure login credentials to use.
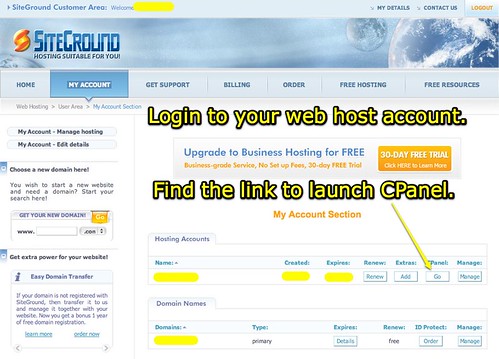
Step 1
Step 1 is to log into your hosting account with your secure userid and password, and find the link to launch CPanel. Depending on how you have security configured on your account, this could be the same or a different userid/password combination.
The screenshots below are for CPanel 11. Like other programs, there are different versions of CPanel so your screens may look different depending on the version in use by your webhost.
A subdomain is a directory on your server which is accessible by a prefix in front of your root domain address. For example, I have our family learning blog setup on the subdomain learningsigns.speedofcreativity.org. I could have set that up on a subdirectory of the main site, so it was something like www.speedofcreativity.org/learningsigns, but I think it looks more polished / professional to use a subdomain for a separate website like this. Functionally it does matter: A content management system (CMS) like WordPress will run fine with either address scheme. Really this is a matter of the website address/URL you want to share with others. This is also the web address which will be indexed by search engines like Google.
Step 2
Step 2 in CPanel is to scroll down to the DOMAINS section and click on Subdomains. Many web hosts will let you create an unlimited number of subdomains. (Mine does.)

Step 3
Step 3 is to specify the prefix you want to use as your subdomain, and the directory on your server where you want this website to actually live / reside. In this case I’m creating a subdomain using “digitaldialog.” This name cannot contain spaces, and special characters are probably a no-no. (Dashes may be permissible, though, I’m not sure.) By default, my CPanel wants to put the directory inside the base public directory of my domain, which is “public_html.” On some servers that directory may be “htdocs” or something else.
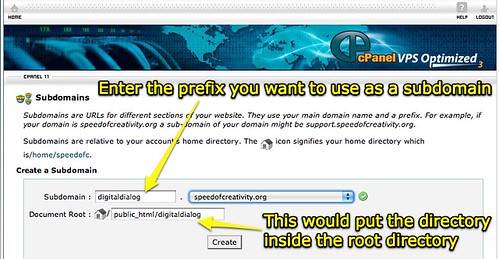
I don’t like putting my subdomain web server directories under the root, because technically that makes them browsable from an alternate address. If I created the subdomain with the settings you see in the above screenshot, my new website would be accessible from either digitaldialog.speedofcreativity.org or www.speedofcreativity.org/digitaldialog. I just want it browseable from the actual subdomain, so as a technique I remove the “public_html/” parent directory from the file path for the subdomain. This is what my screen looked like before I clicked CREATE:

Note I did NOT have to create this directory on my webserver using a FTP client first. CPanel created this directory for me, automatically when I clicked the CREATE button on the Subdomains menu.
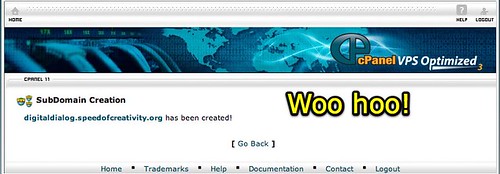
A response message should be displayed indicating your subdomain has been created.
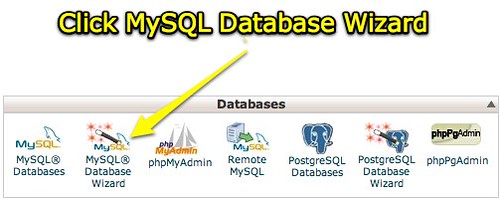
Step 4
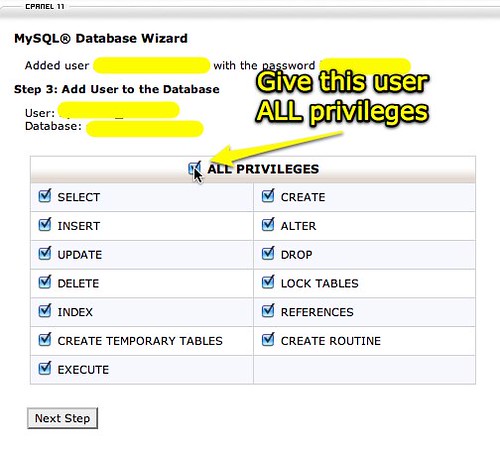
Step 4 is to create the mySQL database which WordPress is going to use, along with a user account that has full access rights to the database. To do this, in CPanel click the HOME button in the upper right corner. Then on the CPanel homepage, scroll down to the DATABASES section and click MySQL Database Wizard.
Enter the name you want to assign to the MySQL database. This is a name you will use, but web visitors will not normally see. For security reasons, it’s probably a good idea not to advertise what your MySQL database name is, so I’m not revealing the actual name I chose in the next screenshot.

For my web host, and perhaps yours, the userID for my account is the prefix for all databases, followed by an underscore. You will want to make a note of this, along with the userID and password you select. This userID and password will not be visible to web visitors, but you’ll need to use it when you configure WordPress.

Next, you will assign RIGHTS to the user account you just created. Be sure to copy down the full userID and password for the account you just created, which should be shown at the top of the screen. You should have already copied down the name of your MySQL database, remembering your userid with an underscore may be the prefix for the database name. Click to add ALL PRIVILEGES to the user account, and click NEXT STEP.
At this point, your subdomain and MySQL database is configured and ready for a CMS installation. In this case, we’re going to install WordPress.
Step 5
Step 5 is to download WordPress and unzip it.
Download the latest version of WordPress from http://wordpress.org/download/ in zip format. This file will download to the default file download location for your web browser. On a Mac, this is usually your USER folder and the DOWNLOADS folder.
You will need a program to “decompress” or “unzip” this file. Older operating systems did not come with a program for unzipping, but newer versions do. You should be able to simply double click the zip file, and on a Mac an “unzipped” version of the WordPress installation directory will be created in the same folder as the original zip file. On a Windows computer, you may have to drag the contents out of the zipped folder/directory and put them in a different location.
Step 6
Step 6 is to upload WordPress to your web host, in the new directory you created on your host server in Step 3.
This may be the trickiest part of this entire process, since it requires the use of a FTP client. ALL web publishing used to require FTP at one point, unless you were working with a server that had the dreaded “Frontpage extensions” installed on it. If you don’t know what I’m talking about here, count yourself lucky. You will need to use a FTP client to upload your WordPress installation, however. I like using the free Mac FTP program Cyberduck. I’ve used a few different programs for FTP over the years, but currently this one is my favorite. It doesn’t require a license key or any registration to use with full functionality.
In your FTP client, you’ll have to enter your hostname, userid, and password. You can get these, or create a new userid and password for FTP, by scrolling down to the FILES menu in CPanel and choosing “FTP Accounts.”

Note the root directory which the FTP account you use is set to access by default. If it is set to directly login to “public_html” or “htdocs” you will want to change that to the server root, if you created your subdomain directory at the root level as I did in this example. My web host provides clickable configuration settings for several FTP clients.

Use that configuration file and/or settings to log into your web host account with your FTP client. After you login, double click on the directory you created in Step 3 above. You’ll upload WordPress into that directory, by clicking and dragging all the files from the unzipped WordPress folder/directory you downloaded in Step 6. This may take a few minutes, depending on the speed of your upstream Internet connection. The current (v 2.9.2) WordPress installation is a little over 7 MB in size.

Note you do NOT want to simply drag the entire “WordPress” folder onto your web host, or else you’re going to put all the WordPress files in a sub-directory of your subdomain. If I did this in my case, my WordPress installation would be accessible from “digitaldialog.speedofcreativity.org/wordpress” instead of just the subdomain address.
Step 7
Step 7 is to configure your WordPress installation using the MySQL database and user account you created in Step 4.
These steps for installing / configuring WordPress are covered thoroughly in the WordPress Codex. Basically, you have to add your MySQL database name, your userid, and password to the file “wp-config-sample.php” in the WordPress directory you uploaded. Then you will rename that file “wp-config.php” so it will “hook” your WordPress installation to your MySQL database.
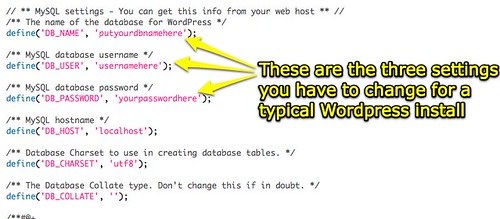
I use the free text editing program TextWrangler to edit files like this. Any text editor should work fine, as long as it saves files in plain text format and doesn’t add special formatting characters. Remember to upload this renamed file into your WordPress directory on the server after you save these changes.
Step 8
Step 8, after you’ve uploaded your customized “wp-config.php” file into the root of your ftp directory, is to visit your new website in your web browser and finish your WordPress installation by creating you administrative account. You’ll enter a name for your blog, your email address, and then click INSTALL. That’s it!

Your WordPress installation in your web browser should now show you a default admin user password. Copy this to your computer’s clipboard, and use it to login to your site with the userID “admin.”

This is entirely optional, but one thing I read about somewhere and do for all my WordPress installations is add several addresses to the “Update Services” field you can find under Settings – Writing. These are the addresses I add there:
http://rpc.pingomatic.com/
http://rpc.technorati.com/rpc/ping
http://blogsearch.google.com/ping/RPC2
http://services.newsgator.com/ngws/xmlrpcping.aspx
http://rpc.weblogs.com/RPC2
My perception is that by using more update services, your blog / website gets indexed better by search engines. I recently activated Google Analytics on my main blog, and while I haven’t done a thorough analysis of the stats it looks like almost two-thirds of my monthly web traffic is now coming from search engines. (Does that mean I should be running ads?) If you don’t want good search engine indexing, you can disregard the previous tip, but if you do it’s something to consider. It’s also free! By putting in these additional addresses, those websites get notified every time you post new content to your site so it can be indexed.
Step 9
Step 9, after you login to your WordPress dashboard and change your admin profile password, is to install the WordPress plugins you’ll want to use. Plug-ins extend the functionality of WordPress, but they also can cause grief if their developers do not keep them up to date and they cause conflicts with each other. On my main blog I currently use 20 different WordPress plugins, which are listed on my “about page” dynamically using WP-PluginsUsed.
One of the best things about newer releases of WordPress is the ability to DIRECTLY install plug-ins from the WordPress dashboard. With older versions, you had to download a plug-in and then use FTP to upload it into your wp-content/plugins directory. You can still add plugins that way, but it’s much easier to use the dashboard install option if the plugin you want is available in the official WordPress Plugins directory.

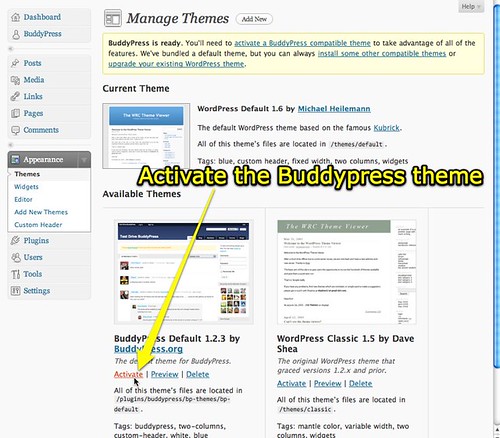
For this Digital Dialog learning community, I’m initially just opting to install Buddypress, Photo Dropper and Smart YouTube as plugins. I may choose to add additional plugins later. After installing Buddypress, you’ll be prompted to change your permalink structure, which is a two click process.
Step 10
Step 10 is to select your desired WordPress theme and add customizations with widgets and other settings. Buddypress requires a special template, so after installing it you’ll want activate it by clicking APPEARANCE in the WordPress dashboard and activating the Buddypress default theme. Magically, it is also installed in the correct WordPress directory (wp-content/themes) on your server at the time you install the plugin.
Now we’re done! Those are the setup and configuration steps. This is probably the tenth time I’ve done these steps, except for the Buddypress installation, so this all seems pretty familiar to me now. If you haven’t worked with CPanel or WordPress previously, however, I’m sure a lot of this might seem like a foreign language. The great thing about WordPress is that it’s open source and has not only great documentation, but also a great user community which is a support base.
At this point I’m just making some minor configuration changes to my Digital Dialog Buddypress installation. I’m going to explore the “import from Ning” options, which include a limited (but free) user profile importer, and a more powerful (but commercial – $79 US) importer from the WPMUDEV team led (I think) by James Farmer.
WPMU DEV has what looks like a great manual / online tutorial for Buddypress but you have to be a paid member of their community to view the full version.
I’m eager to put Buddypress through its paces and see how it compares to the functionality possible with Ning. If you’re interested in helping me in this process, as well as discussing issues related to Internet Safety and digital citizenship, please join the new Digital Dialog learning community! Currently I have it set to allow anyone to register. I copied the same profile questions I’d been using on the older Ning, so hopefully that will keep spammers at bay. I’ve found open registration settings on “normal” WordPress blogs are an invitation for spammers to join your site in droves.
The learning about Buddypress has begun! Good luck with your own WordPress and Buddypress experiments. I hope this post helps you in your explorations!
Technorati Tags:
howto, install, installation, tutorial, wordpress, buddypress, subdomain, cpanel, mysql, database, configure
If you enjoyed this post and found it useful, subscribe to Wes’ free newsletter. Check out Wes’ video tutorial library, “Playing with Media.” Information about more ways to learn with Dr. Wesley Fryer are available on wesfryer.com/after.
On this day..
- Storychasing Live Events: A Guide – 2023
- Orientation Challenge in MinecraftEDU – 2014
- Block Text Messages / SMS Spam and Phone Calls on Your iPhone – 2012
- NCLB has killed creative teaching and energetic learning about science (at least before state testing) – 2010
- #ISTE2010 Constructivist Celebration and The Imagine It! Project – 2010
- How We’re Reinventing the Blog by Sachin Agarwal (Posterous co-founder) – 2010
- Storychasers is looking for a new logo via @crowdspring – 2010
- Internet Safety Issues: What can librarians do? – 2008
- Internet Crimes with Larry Boggess of OSBI – 2008
- Internet Safety Issues with Joel Gabel of Google – 2008
Comments
3 responses to “Setup a new WordPress installation as a subdomain with Buddypress”
Thanks for the fantastic tutorial!
Have been meaning to install Buddypress for a while now and your step-by-step guide worked perfectly – http://community.brightone.org.uk/ is now up and running 🙂
Now to find a step-by-step to customise Buddypress…
So glad it helped, Ben! I’d like to find a good tutorial for Buddypress customization as well… It looks like the Buddypress community is pretty active, so if you can’t find something readily there I bet you can post a question and find one… Good luck!
Thanks for always sharing your expertise, Wes. This tutorial is exactly what I was looking for. Our district has a ning set up at http://district6.ning.com and our communications group has to make a decision quickly as to whether to pay $200 a year for Ning and lose the group features or go to something else. I saw Sylvia Tolisano’s installation of Buddy Press on her new Around the World with 80 Schools http://aroundtheworldwith80schools.net site, and it looks good.
I’m just a little worried about maintaining a social networking site. Your directions will help me sandbox a site for a few weeks to see if it’s a viable solution.
Thanks always for sharing practical information like this, as well as your deep thinking about learning in a new world. You are definitely one of my Yodas! 🙂