Living as we do in a sea of digital information, we all need to set and manage clever “information traps.” The reason is simple: Every day we encounter useful, digital “stuff” we want to save for later and in many cases share with others. In this post, I’ll describe how to use Zoo Tool, Posterous, ifttt (if this then that) and email to create an information trap which takes a link and simultaneously:
- saves it to Diigo (my primary social bookmarking site)
- saves it to a “quick blog” I created on Posterous for stuff I’m reading (wesread.posterous.com)
- Subscribes to the blog or site in my Google Reader if it has an available RSS feed
- Tweets out the link if I choose to share it with a special tag (zt for “zoo tool”)
Update December 20th: By request I’ve created a 15 minute screencast explaining most of these steps.
All of the web services I’m using for this “clever information trap” are free, with the exception of Zoo Tool. To post links to Zoo Tool using email, a PRO account is required. You choose how much to pay for the PRO account however: From $1 to $100 per year. I paid $12 for mine.
BACKGROUND
Since the Google Reader design team made the lamentable decision to STOP allowing post sharing via its “Shared Items” API, I’ve been on a quest for an alternative article sharing solution. I like sharing articles I read via a blog sidebar widget, but at this point the Mobile RSS family of apps are the only tools I have which still let me share articles via the deprecated Google Reader “Shared Items” channel. (See my November 2011 post, “Google Reader Post Sharing Still working with Mobile RSS” for more info.) In August this year, I attended a fantastic breakout session in Montana by Jason Neiffer titled, “Capture: Setting Up Traps to Organize Mountains of Information.” I love Jason’s metaphor of creating “information traps.” Rodd Lucier (“The Clever Sheep”) showed me the fantasticly powerful website “if then that” (ifttt) about a month later in Shanghai during the Learning 2.011 conference. As I considered a replacement for the “old school” Google Reader article sharing method, I decided I wanted a solution which went beyond past functionality. Every news application on my iPad permits sharing via email, and I’ve been using a Posterous blog for several months now (wfryer.posterous.com) as a “sandbox site” for saving and sometimes sharing (via a cross-post) content I find online. Scott McLeod‘s “Mind Dump” quickblog was an inspiration to me for this.
In going “beyond past Google Reader article sharing,” I wanted to integrate my Diigo account. Since I started using web 2.0 tools around 2003, social bookmarking has been a vital cornerstone of the tools in my information toolbox. I started with Delicious and eventually moved to Diigo, in part because it supports cross-posting to Delicious. In addition to integrating Diigo, I also wanted to streamline the process of subscribing to new blogs. Typically when I find a new article I like, I subscribe to that blog in my Google Reader. This makes for a lot of feeds, but Google Reader doesn’t hiccup or stutter. I wanted to find a way to follow “the ethic of minimal clicks” which I highlight in “Playing with Media: simple ideas for powerful sharing.” With just a few clicks, I wanted to do a bunch of useful things. This “clever information trap” is what I came up with, and so far I love it. I used Feedburner to ‘burn’ the feed for my wesread.posterous.com quick blog, and its free “Buzzboost” HTML code to add an additional blog sidebar widget for these shared articles and links. This is a great technique more schools should consider to add blog content on the district homepage or in the sidebars of other website pages.
BASIC SETUP: POSTEROUS-ONLY
The easiest and fastest way to setup an email-driven information trap is to create a free Posterous blog. Email anything to post@posterous.com and the site will post the content of your email message to your own website. A Posterous-based “information trap” is great for groups and teams, as well as individuals. Add team member emails to your site, and then anyone can send links, notes, images, videos, and anything else for sharing on the site. Since the site can only be the ‘primary Posterous blog’ of the creator, team members wanting to post on it will use the name of the blog followed by @posterous.com. For example, people submitting 5 photo stories to my Posterous blog on 5photos.posterous.com send emails to 5photos@posterous.com. This “information trap” setup is relatively straightforward and simple. Consider doing this first, if you haven’t worked with Posterous already, before you attempt additional steps suggested in this post.
STEP 1: CREATE ACCOUNTS
For the procedures I’ll describe below, you’ll need to create several free web accounts and 1 “pro” account if you don’t already have these. They include:
- Posterous.com account (free)
- ifttt account (free)
- Diigo.com account (free)
- Google Account (free – for Google Reader)
- Zoo Tool Pro Account ($1 minimum)
STEP 2: CREATE IFTTT TASKS
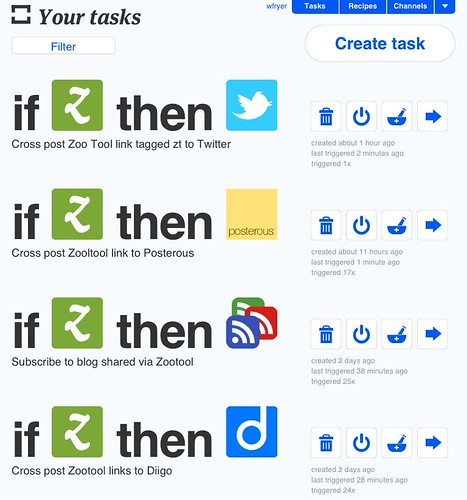
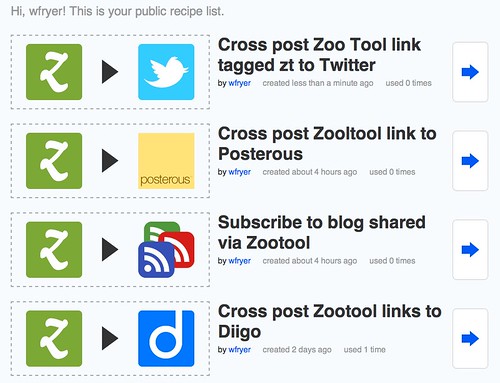
The website ifttt is the key to this “clever information trap.” Ifttt works with ‘tasks’ which are composed of ‘triggers’ and ‘actions.’ Login to Ifttt and grant authorization for it to access your Posterous, Google Reader, Diigo and Twitter accounts. You could re-create all the tasks I made from scratch, but I’ve shared these as ifttt ‘recipes’ you can import and use.
STEP 3: USE YOUR ZOO TOOLS EMAIL TO SHARE
After upgrading to a pro Zoo Tools account, visit zootool.com/pro and click “Email-Lasso” to view your personal, private email address to post to “your Zoo.” I saved this in my address book so I can readily type “zoo” and the address auto-fills whether I’m sharing an article or link on my iPad, iPhone, or laptop. Ifttt doesn’t run continuously, it has a ‘schedule,’ so it may take awhile for your link to appear on all your connected sites: Posterous, Diigo, and Twitter. Here’s an example.
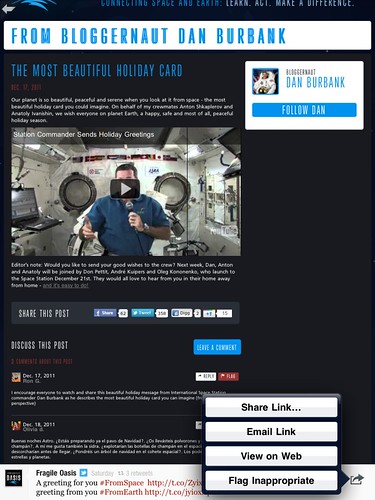
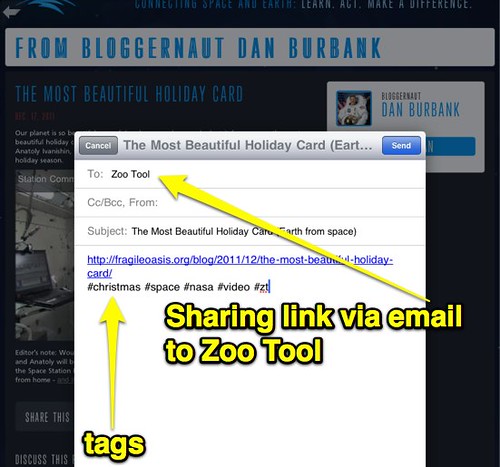
Earlier this evening, I used the Flipboard app on my iPad to view my Astronauts Twitter List. For any post in Flipboard, a SHARE link is available in the corner which provides different options. I chose EMAIL LINK.
I typed “zoo” in the “to” field of the email message which popped up and my iPad auto-filled my Zoo Tools sharing address. I edited the body of the message so the link came first. Then I added several tags I wanted to use for the saved bookmark, and preceded the tags with a # sign like we use for Twitter hashtags.
Since I included the tag “#zt” (for “Zoo Tool”) my ifttt task for Twitter cross-posted this link to my account.
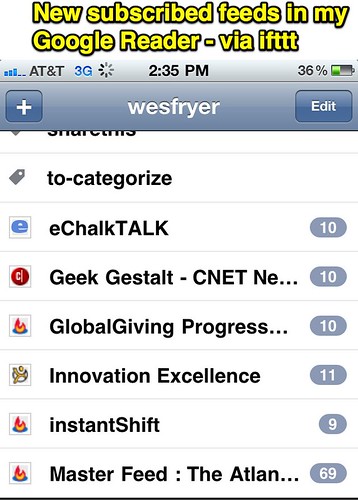
I love how this “clever information trap” auto-magically adds the RSS feed for a blog or other website which I share, within Google Reader. This is a screenshot of blog feeds added to my Google Reader earlier today. I used Mobile RSS Free on my iPhone to categorize several of these and delete one of them. This process was quick and simple.
That’s it: A clever information trap” built with Zoo Tool, Posterous, & ifttt! Zoo Tool is a powerful service which has MANY more features than I’m using at present, but I was most interested in finding a service which supports social bookmarking via email. Diigo doesn’t do that, but thanks to ifttt that doesn’t matter. If you give this “information trap” idea a try, please let me know via a comment here or Twitter. I’d also like to hear other ideas about similar processes for “trapping information” with a minimum of clicks, both individually and in groups.
EXTRA INFO: SETTING UP A TASK ON IFTTT
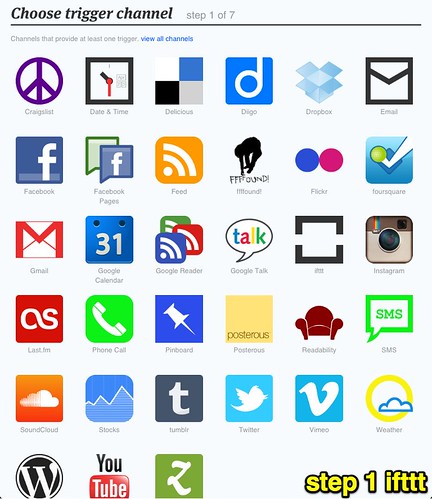
While you’re welcome to simply import and copy the ifttt recipes I created, I did create some screenshots documenting the steps for creating a task on ifttt. I absolutely LOVE the creative ways this website is being used, and the ways it empowers “non-coding geeks” (like me) to create some very useful information functions.
Click CREATE A TASK. Click THIS to setup your trigger.
Choose the “trigger channel” you want to use on ifttt. For the examples I’ve described in this post, Zoo Tool was my trigger channel for all four tasks.
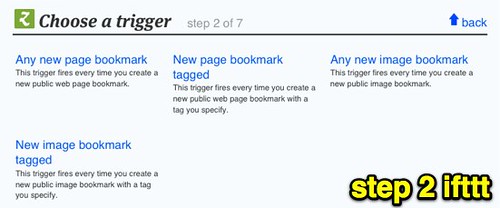
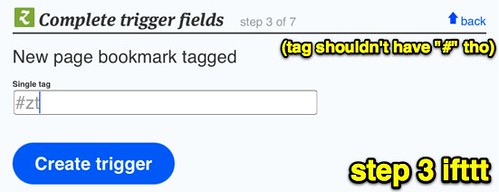
Select the specific context for your trigger. These vary according to the tool selected. For all my tasks in this example except the Twitter cross-post, I used the Zoo Tool trigger, “Any new page bookmark.” The Twitter task uses “New page bookmark tagged.”
Click to create your trigger.
If you selected “New page bookmark tagged” or another trigger requiring a specific tag or term, enter the desired info and click to create the trigger.
Click THAT to create the second part of your ifttt task.
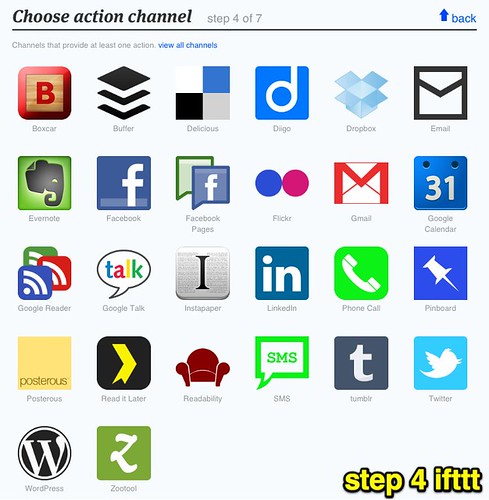
Select your action channel. For these examples, I chose Posterous, Diigo, Google Reader and Twitter as my action channels.
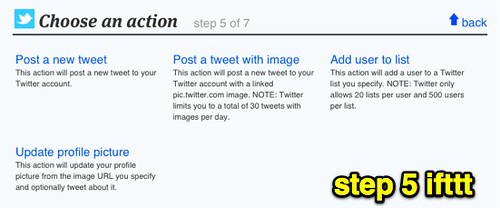
Choose the desired action for your channel. Available options depend on the channel selected.
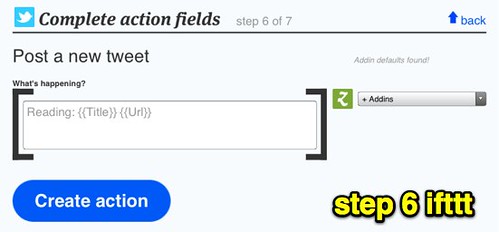
Note you can insert different kinds of content from the “trigger channel” to use as desired. In the case of my Twitter task, I chose to insert the text “Reading:” prior to the title of the link and link URL.
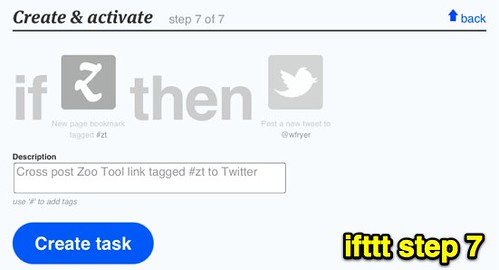
Last of all, enter an optional description for your task and click to create it. This description will help others decide if they want to use your task if you choose to later share it as a ‘recipe.”
Good luck and happy information trapping!
Technorati Tags: information, trap, diigo, zoo, tool, zootool, ifttt, trigger, task, recipe, education, school, collaborate, team, post, blog, posterous





Comments
6 responses to “Create Clever Information Traps with Zoo Tool, Posterous, & ifttt”
I had been waiting for someone to take ifttt and do something amazing with it. I think that qualifies as something amazing. 🙂 Nice work, Wes, and thanks for the shout out!
Thanks 🙂 I’m sure others have created workflows even more impressive, but this one definitely has me enthused… sharing more with fewer clicks. (And sharing selectively, I’ll add…)
Good Morning Wes!
Being the ‘visual learner’ that I am, I thoroughly enjoyed (and appreciate the effort) your explanation. Might be something I want (need?) to add to my winter break to-do list.
And would you mind sharing what program you used to create the video? Loved being able to see the person behind the voice.
Happy holidays to you!
Nancy
Thanks for the feedback, Nancy. Glad this was helpful.
I used Screenflow software to create this screencast. Definitely my favorite screencasting tool for edited screencasts:
http://www.telestream.net/screen-flow/
Happy holidays to you too!
This process looks like something I’ll explore next week. Thanks for sharing, as always, in easy to follow, visual steps. I’m always learning from you!
One thing I did discover after losing my ability to share blog posts from Google Reader is that Diigo has a (new?) feature that allows the same kind of functionality. On my Diigo toolbar, it’s called “send”. https://secure.diigo.com/blog_this/config It allows you to share and comment on a single post from Reader – after clicking on the original article- to your blog (or Twitter, Facebook, Diigo Lists, or email). It’s helped me to begin sharing interesting reads to my blog again, with minimal clicks. You probably already know about it, but thought I’d share in case you didn’t.