Put your geek hat on for this post. My challenges continue with my web hosting account and my need to optimize it for a large number of connections / lots of traffic so it does not crash when I share a new post via social media like Twitter or Google+. My most recent website/WordPress discovery and “tweak” to improve things involves “GZIP compression,” which is something you can enable on an Apache webserver by adding some code to the “.htaccess” file located in the root directory of an individual website’s file system on the hosting account. GZIP compression is a form of “http compression,” and basically it makes text files smaller so they transfer faster over the Internet and therefore speeds up your entire website experience for visitors when enabled. The Google Developer article, “Optimizing encoding and transfer size of text-based assets” provides more information about GZIP compression. See my past posts for more background about my struggles and what I’ve learned trying to optimize my WordPress websites, and my primary blog (this site) specifiically:
- “Comparing Differences in Website Statistics Between CloudFlare and Google Analytics“(28 Dec 2014)
- “Comparing WordPress Page Caching Options” (24 Dec 2014)
- “WP Super Cache To the Rescue” (30 Oct 2014)
- “Why I Switched My WordPress Web Host from WP Engine to Site5” (5 Jan 2015)
The WordPress caching plugin I started using in December 2014 and REALLY like now is “Quick Cache (Speed Without Compromise)“. In stark contrast to the plugin “WP Total Cache,” which has a dizzying / confusing array of settings to change and customize, Quick Cache has almost none. WP Total Cache is used by many large and heavily trafficked WordPress sites, but the technical knowledge to customize and optimize it correctly is beyond my current technical skill or the technical skill I want to acquire. “WP Super Cache” is another plugin I tried and had some success with, but it still requires some customization and I think my results with Quick Cache have been better.
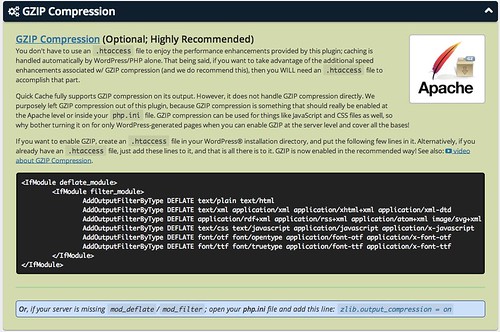
One customization which “Quick Cache” does recommend is enabling GZIP compression. After you install the plugin it has a series of menus, and this is the menu for GZIP. As the plugin authors note, this isn’t something you should or can just change within the plugin, you need to make changes to the “.htaccess” file in your web hosting account.
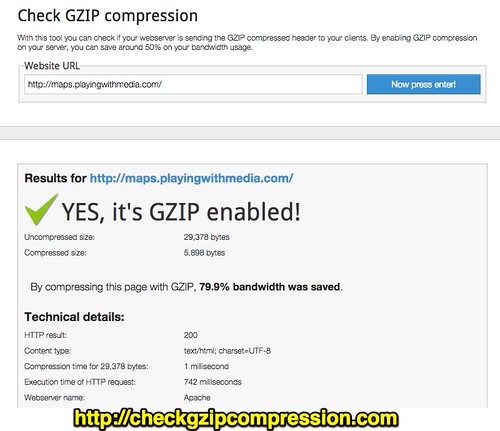
The first step in this process should be to check whether or not GZIP compression is already enabled on your website. By entering your web address on the free site checkgzipcompression.com, you can check the GZIP compression status in a few seconds. It’s not necessary to login to the admin dashboard of your WordPress site to do this, in fact you should be VERY wary of any 3rd party website which would require this to check your website performance. (They could be phishing your website login credentials to install malware or do something else malicious.) In this case, just enter your website URL into checkgzipcompression.com and the result will display shortly.
Once you confirm GZIP compression is not enabled and you need to enable it, here are steps to do it:
- Log into your hosting account’s CPANEL and open the FILE MANAGER. Be sure “show invisible files” is selected so you can see files like “.htaccess” which start with a period.
- Navigate to the directory containing the website / domain files for the site you want to change.
- Download the “.htaccess” file to your computer. Make a backup copy of the file first, so you can upload it and restore everything to “the way it was” just in case you mess something up in this process. It will likely download without the period at the front of the filename, so it will just be “htacess” in your downloads folder.
- Use a text editor (I like and use TextWrangler, which is free for Mac users) to open the .htaccess file.
- Copy and paste the code provided by “Quick Cache (Speed Without Compromise)” WordPress plugin into the file, and save it. I inserted the code in my .htaccess file after the code inserted by iThemes Security and before the default WordPress code section.
- Upload the edited version of your .htaccess file as “htaccess” using the CPANEL file manager.
- Again using CPANEL file manager, delete your existing “.htaccess” file on your webserver.
- Using CPANEL file manager, rename your newly uploaded “htaccess” file as “.htaccess” adding the period at the front so it will work as it should.
Here’s my GZIP compression status verification image after I completed these steps on my “Mapping Media to the Curriculum” website. I haven’t yet enabled GZIP compression on all my 30+ WordPress websites, but I enabled it on several of my most heavily trafficked sites.
Eventually I think I’ll enable GZIP compression on all my websites. So far I haven’t read anything that indicates there is a disadvantage to enabling GZIP compression. If you know one, please let me know via a comment or tweet.
Some other WordPress optimization options my web host (Site5) technical support staff shared with me that I’m trying are:
- Free WordPress “P3 (Plugin Performance Profiler)” plugin – identifies plugins slowing down loading times the most
- http://gtmetrix.com – generates a free website performance analysis report and makes suggestions about things to address / improve to speed up load times
- Other WordPress optimization techniques via Site5.com
Hopefully enabling GZIP will further strengthen and optimize my WordPress installations so they’ll stay online after I share new posts on social media! I did learn in my research that free CloudFlare accounts, which I use as a CDN (content delivery network) to help take the load off my own web hosting account, just “crawls” (updates) free accounts every 7 days. There isn’t a way to “pre-cache” a new page/post with CloudFlare with a free account, and even if I was paying I don’t think you can do this. Still, enabling CloudFlare is a good idea and in the long run has/will reduce my server load considerably.
The last thing I learned in this latest bout of WordPress website optimization research and tweaking is to NOT make changes to my WordPress site right after I share a new post on social media. Even a new post update seems to potentially cause problems if lots of new connection requests are coming in right after a new post (not cached by Cloudflare) is shared on social media. Since “Quick Cache” does not create or show a cached version of a webpage when I’m logged into the site as an administrator, I also am opening the new post in a Chrome “incognito window” so the cached page is created prior to me sharing it on social media. This may be unnecessary, but I’m hoping that will further “ready” my site to speedily serve new webpage requests for the latest post without crashing.
If you have any insights or further suggestions on any of the issues / topics I’ve touched on in this post I’d love to hear them.
I’ve also (at last) added a new category in my blog for WordPress-related posts. Of over 5800 posts I’ve shared online since 2003, about ten percent of them reference WordPress in some way. I added 100 of them to this new WordPress category. Almost all of those posts also are in the category “blogs.”


