
Landon Brockhert is a computer science student at the University of Central Oklahoma, and is the part-time paid computer/AV guru for our church in Edmond. Landon is the reliable guy behind the scenes who makes sure the SmartBoard is setup each Sunday morning when I teach 5th graders, and setup the SmartBoard each day this past fall for my Wednesday night adult classes on Google Earth and iTunes University. Landon ingeniously set up a program on a Windows computer in the church office which takes a high fidelity WAV format recording of a Sunday sermon, compresses it into a 32 kbps version, and uploads it via ftp to our church’s server, all with a few mouseclicks by our church secretary. From there, our church communications director links it up on a webpage for sermon podcasts and also links it to a feedburner RSS feed via a new Blogger post. Landon is a VERY smart guy.
Today after Sunday school, however, rather than talking about Smartboard setups or podcasting, Landon visited with my 11 year old son and I about some exciting computer programming he’s been doing for fun. This photo shows an $8 Radio Shack breadboard with LED lights which Landon has recently learned to create and program:
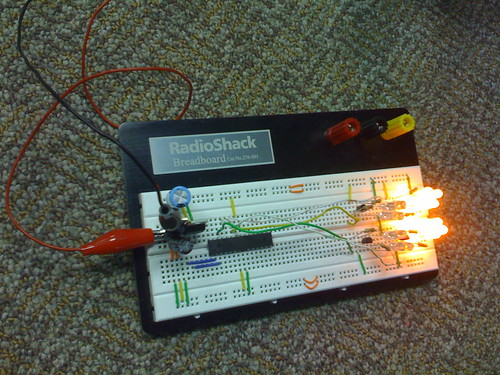
A breadboard (solderless breadboard, protoboard, plugboard) is a reusable solderless device used to build a (generally temporary) prototype of an electronic circuit and for experimenting with circuit designs. This is in contrast to stripboard (veroboard) and similar prototyping printed circuit boards, which are used to build more permanent prototypes or one-offs, and cannot easily be reused. A variety of electronic systems may be prototyped by using breadboards, from small circuits to complete central processing units (CPUs).
My son has a small and large snap circuit board kit, which is very simple but has given him some introductory opportunities to learn about electricity, circuits, current, and some other foundational ideas of electrical engineering. Although I took (and did pass) an introductory course on electrical engineering in college, I will readily admit that my own functional knowledge in this area is VERY limited. I know that hands-on learning, play and exploration in this area (with some supervision, of course, to try and keep things safe) could be VERY important in helping my kids cultivate both their own interests as well as their perceptions of their own skills in and among different content areas. I want my kids to perceive themselves as extremely capable and literate individuals, both in language arts and the social sciences as well as in hard science. Since neither my wife or I are professional scientists, this is a challenge, but I think opportunities to act like and be real scientists, forming and testing hypotheses through experimentation, can go a long way toward advancing these goals with my own kids. With these ideas in mind, I was very interested and enthused to see and learn about what Landon shared today.
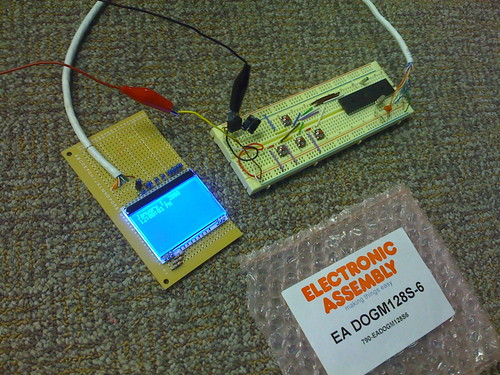
This image shows a different breadboard and processor Landon has purchased and programmed, which is outfitted with a small LCD screen which costs about $20. The chips Landon is using cost between $2 and $7 each. The smaller of the two is shown on the image below, and is a “AT MIL” chip from AT Mega Chips. Landon orders most of his equipment from Mauser.
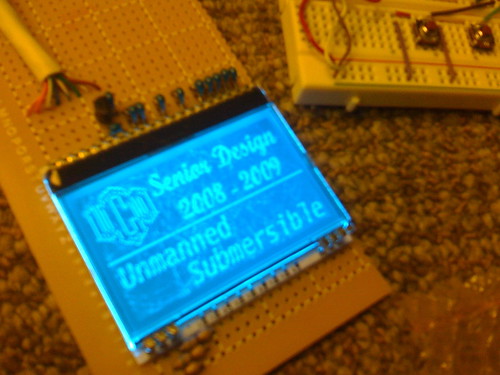
This image is a close-up of the LCD screen. The screen itself is about $15, the backlight (which Landon chose as blue) costs $5:
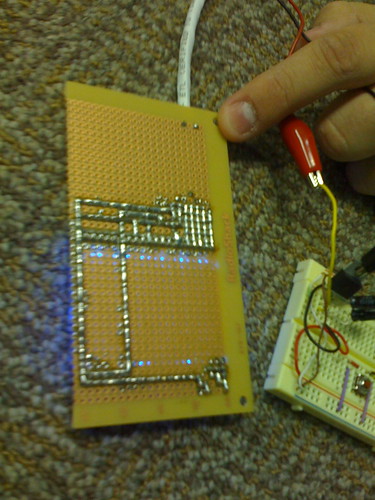
This picture shows the soldering job Landon did to connect the LCD screen to a circuit board, following the wiring schematic which came with the screen:
Landon explained to Alexander and I that some of the small integrated chips like those he’s using for these mini-computers have built-in translators which can be used to display ASII text. The ones he is using, however, do not, so he wrote his own program to convert a particular font into binary code. This photo shows some of those code sequences on his laptop screen. This literally makes the letter “a” display correctly on the LCD screen:
Landon has not written all this binary code by hand, however. He has written a VisualBasic program which takes simple two-color graphics he creates in PhotoShop, and then writes the binary code required to display them on the LCD screen. He then copies that code into the C++ program, and uses the open source program WinAVR to compile the C++ code into binary code which can then be transferred from his computer into the ROM memory on the flash-based circuit processor.
The flash-based circuit processors Landon is using on these two breadboards have 64K of ROM, and 4K of RAM. It strikes me as amazing that the computers NASA was using for the Gemini and Apollo space programs in the late 1960s and early 1970s had 64K of RAM. ____ , a Gemini and Apollo program flight engineer for NASA, mentioned this when I interviewed him recently for a podcast. Just think of it: The computational power of NASA’s best computer when we landed on the moon, now available for anyone to order online for just $7 US. Amazing.
I encouraged Landon to create some YouTube videos documenting what he’s created and learned using these breadboards and electronic components, and he said he’s considering setting up a blog or other website. (I recommended using WordPress or Blogger.) Over the holidays, he may get together with another friend who is wanting to use homegrown electronics like this to create custom LED blinkers for his motorcycle. If possible, I told Landon I’d love to record a short video we could post to YouTube in which he explains the components, products, and processes he’s used to create both of these electronic circuits.
My professional career track has taken me away from work in programming, elementary circuit design, and robotics, but as I mentioned earlier I really want to learn more about these applications for the sake of my own kids. I’d also like to encourage others to pursue hands-on learning opportunities in these areas too, of course. That is one of the reasons I keep a link to the free Scratch programming environment at the top of my blog.
Thanks to Bob Sprankle initially sharing a podast recording of Dr. Mitch Resknik at BLC07, and hearing Dr. Resnick present at NECC 2008 this past summer, I’ve heard a little about his company PicoCricket. PicoCricket manufactures circuit boards which permit students to more easily do some of the things Landon has used inexpensive electronic components to do, like turn on lights and output data to a display, but with simpler user interfaces. The PicoCricket devices also include and interface with more advanced input devices, like sensors, so the output of those devices can be utilized by software programs. A PicoBoard costs $50, and actually permits learners of any age who create a program in Scatch to interface their program with Scratch programs.

Last summer at NECC, in addition to hearing Dr. Resnik discuss Scratch and PicoCricket, I also interviewed a representative from Lego about their new product “WeDo” scheduled for U.S. release in January 2009. “WeDo Robotics” include products designed for elementary students ages 7 – 11.
I’m not sure if Santa will be shopping at PicoCricket for our household this year or not, but if he does, I’m sure those gifts would “keep on giving” for a LONG time after the holidays are over! 🙂
Technorati Tags:
robotics, programming, radioshack, breadboard, lego, wedo, circuit, electronic
If you enjoyed this post and found it useful, subscribe to Wes’ free newsletter. Check out Wes’ video tutorial library, “Playing with Media.” Information about more ways to learn with Dr. Wesley Fryer are available on wesfryer.com/after.
On this day..
- iPad App Clean Install (December 2014) – 2014
- Learning About Posting YouTube Videos to WordPress, Windows RT Copy Paste, and iMovie for iPhone – 2013
- Location Change for December OKC Google Tools Workshops – 2010
- Google Goggles: A new way to search with pictures – 2009
- iPhone and iTouch video out functionality, 1 to 1 Learning, and CCC Pedagogy – 2008
- When things go wrong, we learn and go on… – 2007
- Live on the web from Pearl Harbor: NOW – 2007
- Archive of Dec 6th videoconference from Pearl Harbor – 2007
- Pearl Harbor Videoconferencing VoiceThread – 2007
- Impressed with Verizon USB data modem – 2007
Comments
5 responses to “Breadboards, LED lights, small screens, and programming homegrown, inexpensive computers”
Before you buy, check out Arduino http://www.arduino.cc/ – it’s an open source electronics prototyping platform.
Thanks for sharing that link Sylvia! (I fixed the typo in the original comment.) I will check that out and also pass the link on to Landon.
The WikiPedia article for Atmel AVR has more info about the microprocessors Landon told us about today. The Story of AVR video provides more background as well.
Check out the projects (for either arduino or a typical breadboard) at Make Magazine. http://makezine.com/ They list some really great and fun projects. They also offer the arduino kits as well.
My favorite doesn’t involve either of those it is making a robot out of an old robotic mouse!
http://blog.makezine.com/archive/2006/01/how_to_make_a_robot_from.html
Have fun soldering – I grew up building some great Heath Kits with my Dad, and I still have them around 🙂
Landon has created a blog and has posted a bunch of additional details about his work with AVR technologies.