Creating collages of images is a basic digital literacy skill, and I have a new browser-based favorite tool for this media product: Google Drawings! In this post, I’ll share a few recent photo collages I’ve created to use as header images for Twitter profiles, YouTube channels, and WordPress websites. I’ll also describe the workflow I’m using and an extra app which is helpful in this process. Like Google Documents, Google Sheets, and Google Slide presentations, Google Drawings (and Google Maps) can be created from the Google Drive menu by choosing NEW and then MORE – GOOGLE DRAWINGS.
Thanks to Casey Bell’s (@shakeuplearning) February 2016 post, “Create a Google Classroom Custom Header with Google Drawings,” I learned it’s possible to specify exact pixel sizes for Google Drawing documents. In a Google Drawing document, from the FILE menu choose PAGE SETUP and select CUSTOM. Then from the popup menu select PIXELS and enter your desired canvas size for the image collage. Twitter header images should have a recommended size of 1500 x 500 pixels. YouTube channel art images should be 2560 x 1440 pixels. In the past I’ve used open source/free or free Mac software programs to make image collages like Gimp, SeaShore, and Acorn. Those are programs which must be downloaded to your local computer hard drive, and each have different file formats for saving original images with separate layers for different image collage elements. If you switch computers or format/erase your hard drive, you need to make sure to save the ORIGINAL image files which contain all the different layers. Otherwise, if you just have the exported / flattened image, it’s much harder to make tweaks and adjustments to the collage if needed. Google Drawing documents, on the other hand, can be edited and shared using any computer (including Chromebooks) since it’s entirely browser-based. Since the files are saved in the cloud, there are no worries about saving and preserving original image files.
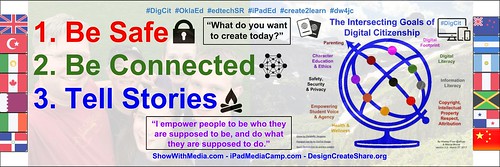
I’ve decided to have a three part theme for our school technology department next year:
- Be Safe.
- Be Connected.
- Tell Stories.
I’m also taking these themes into the conference keynotes and breakout sessions I’ll be sharing this summer and in the 2017-18 school year.
I decided it would be good to include these elements in my Twitter header, along with a graphic I co-created this past year with our school Digital Citizenship Team co-chair, Dr. Marcia Moore. We titled this, “The Intersecting Goals of Digital Citizenship.” Google Drawing supports images with varying opacity levels, so I added a family photo and a favorite photo from Glacier National Park in 2011 with 80% transparency to the image collage in the background, along with flag icons in the sidebars for countries I’ve lived in or traveled in, besides the USA. I also added a few other icons, some quotations I like, as well as Twitter hashtags I use frequently. It’s a busy image, but it reflects a lot of things about which I’m personally passionate and want to share with other people. I also left space for my Twitter photo in the lower left corner. Positioning and cropping is a bit different depending on whether you view Twitter in laptop/desktop browser, in an app, or in a mobile browser. Overall I’m really pleased with the photo collage, and I’m especially thankful Google Drawings makes it so easy to edit. When I was ready to upload the final version to Twitter, I simply chose FILE – DOWNLOAD AS JPG and then uploaded that ‘flattened’ version of the collage to my Twitter profile: @wfryer.
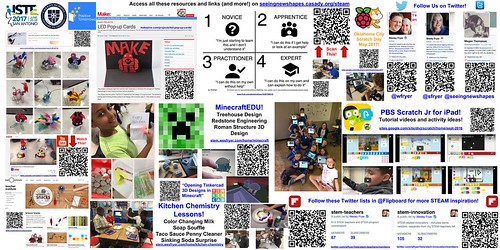
In a couple weeks I’ll be sharing five presentations at the 2017 ISTE Conference in San Antonio. One of these, “Elementary STEAM Studio,” is a poster session. After seeing several people last year at ISTE in Denver who printed long banners which they tacked up to their poster session bulletin boards, I decided to try the same thing this year. The ISTE poster session bulletin board size is 8′ x 4′, so I specified those dimensions in a Google Drawing document (converted to inches) and was able to create a large banner image with the exact dimensions needed. I’m planning to get this printed in color either at a local print shop this week or online via VistaPrint. That way I can roll it up and more easily transport it down to San Antonio from Oklahoma City, since this year we’re traveling by train! All the resources for our poster session are available on Megan Thompson’s (@seeingnewshapes) website page, seeingnewshapes.casady.org/steam.
This summer is the 5th one I’ve led and facilitated 3 day “iPad Media Camp” workshops, and again like last year I’ll be leading these with my wife, Shelly Fryer (@sfryer). Since the apps we’re using in the workshop have changed slightly from past years (as they always seem to do), and I want both the @iPadMediaCamp Twitter channel as well as website (iPadMediaCamp.com) to reflect these changes, I needed to create some new collages! Of course, since Google Drawings is my new favorite tool for collages, I used it to create slightly different images for the iPad Media Camp website header image, the Twitter header image, and the curriculum wiki header image, which is hosted by Google Sites. (wiki.ipadmediacamp.com)
When I’m creating an image collage on my Mac laptop, my favorite utility program to use for making screenshots is Skitch. It’s free, and allows for quick resizing of images. Resized images can be readily “drag and dropped” directly onto a Google Drawing canvas and arranged as desired.
Here are a few tips to use with Google Drawings:
- Hold down the SHIFT key to constrain the proportions of an image you are resizing, so it doesn’t look too skinny or stretched out. (This is particularly important for images of people, but it’s best to always constrain proportions when resizing.)
- Distribute space evenly between several objects you’ve pasted onto your Google Drawing document by clicking one, then holding down the Command key (control key for Windows users) and then clicking additional items. Then from the ARRANGE menu choose DISTRIBUTE and either HORIZONTALLY or VERTICALLY.
- Align objects precisely by selecting them as explained above, and then from the ARRANGE menu choosing ALIGN HORIZONTALLY or ALIGN VERTICALLY. Alignments to the LEFT, CENTER, or RIGHT can be selected.
- Change IMAGE OPTIONS for a single element in the collage by right clicking (two-finger tapping on a Mac laptop or trackpad) and choosing IMAGE OPTIONS. One of the available options is TRANSPARENCY. If putting an image in the background, try setting transparency to 80%. Preview the exported / final image on the actual website you’re posting to and make sure it’s not too light or opaque for the text or other items on top of it.
- Change the ORDER of elements pasted onto your collage by selecting an object in the Google Drawing document, then choosing ARRANGE – ORDER and BRING TO FRONT, BRING FORWARD, SEND BACKWARD, or SEND TO BACK. These can also be accessed by right clicking / two-finger tapping an image and choosing this from the contextual / pop-up menu.
- Remember PNG files can include transparency, but JPG images you import cannot. On my Twitter header image collage, I worked around this using 80% transparent background images, but putting icons that were not transparent (they had white backgrounds) as the back-most objects on the canvas. If you’re using Skitch, remember it can export in either PNG or JPG formats, depending on your needs.
- Consider using icons in your image collages from The Noun Project or IconFinder. Provide attribution by linking images to source webpages and including the artist/creator’s name, if possible. You can view an example of this on “The Intersecting Goals of Digital Citizenship” Google Drawing document. Also consider using stylized text from a website like flamingtext.com.
If you haven’t given Google Drawing documents a try for creating image collages, I strongly encourage you to check it out! In many ways it’s simpler than using an image editing software program, and I love the flexibility it provides to access and edit the original version from any computer. Plus, it’s completely FREE and can work in any modern computer web browser!
My favorite app for creating image collages on an iPad, by the way, is Pic Collage for Kids (free). That’s one of the first media products we learn to create on day 1 of iPad Media Camp! Image collages created with Google Drawings with a laptop or desktop computer web browser can be MUCH more complex than collages created with Pic Collage, but it’s still a great app to have and know how to use.
If you find the tips in this post helpful, please let me know by sharing a comment below or reaching out with a reply on Twitter to @wfryer. Good luck making and sharing image collages with Google Drawings!
If you enjoyed this post and found it useful, subscribe to Wes’ free newsletter. Check out Wes’ video tutorial library, “Playing with Media.” Information about more ways to learn with Dr. Wesley Fryer are available on wesfryer.com/after.
On this day..
- A Low Kilobit MP3 Mystery – 2011
- Playing with Doink Animation – 2011
- 3 months of planning for 2 minutes of StopMotion – 2009
- When we blog, we create the web – 2009
- Defining 21st century classrooms and Highlighting the Importance of CCC – 2009
- Blending Professional Development to focus on Content, Technology and Pedagogy – 2009
- Notes on the Texas Long Range Technology Plan: 2006-2020 – 2009
- Stopmotion Film Camp Starts Monday! – 2009
- Google Earth explorations – 2008
- Podcast257: Natural Learning – What Schools Don’t Do by Steve Wycoff – 2008


