Audio podcasts are one of my favorite types of media products to create and share. While images and video clips used in narrated slideshow and quick edit video projects can significantly enhance engagement and learning for people watching and listening, those elements can also add significant time requirements as well as layers of complexity to a project. Audio podcasts, on the other hand, can have a wonderfully simple yet powerful character. A great deal of emotion and complexity can be communicated with spoken words, yet the process of recording and sharing those words with “only audio” doesn’t have to require hours of post-production editing. In this post, I’ll share several different audio podcasting workflows which I’ve used and am using now in August 2016. For more resources about podcasting, please check out the “Radio Shows” page of ShowWithMedia.com. If you have questions about any of this, please reach out to me on Twitter (@wfryer) or leave a comment on this post.
My past posts on the topic of podcasting workflows include:
- How I create and publish podcasts (Oct 2009)
- Creating a course audio lecturecast (podcast) with Podcast Generator (Sept 2010)
- Normalize Audio Recordings Before Publishing a Podcast (March 2012)
- Conference Podcast Recipe and Workflow (April 2015)
- Podcasting Options with WordPress (July 2015 – includes presentation audio)
- Comparing Podcast Audio Normalization Options (Oct 2015)
- Workflow Publishing 30 Normalized Conference Audio Recordings (Jan 2016)
I’ll preface this discussion by noting some easier alternatives exist, but they come with drawbacks which should be understood and acknowledged. My wife, Shelly Fryer (@sfryer), is in her second year of creating and sharing a classroom audio podcast (radio show) using the free iPhone app “Opinion.” Opinion hosts podcast audio files for free, and episodes can be up to 10 minutes long (for the free version) or of unlimited length if you purchase an in-app upgrade for $4. Including Opinion, here are 5 different apps and web services which provide free or “free with limits” audio podcast hosting as well as recording:
The main drawback to consider for all of these apps and platforms is that they might go away. Cinch and Gabcast were two “web 2.0 tools” for audio podcasting which died untimely deaths, and the same thing could happen at any time for other commercially-provided podcasting hosts. The podcasting workflow with these apps can be much faster and easier, supporting “the ethic of minimal clicks,” but the potential longevity of recorded audio is always in greater question when relying on a “free” hosting solution. (“Playing with Media: simple ideas for powerful sharing,” 2011.)
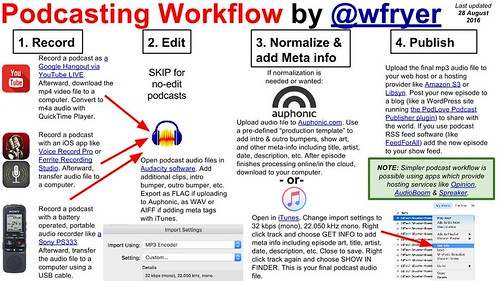
The main steps of the podcasting workflow I currently use and recommend to others includes four main steps:
- Record
- Edit
- Normalize & add meta info
- Publish
I created a hyperlinked Google Drawing document, saved as an image below, to visually highlight the key steps in this workflow.
Record
There are three primary ways I currently record podcast audio. For the weekly webshow and podcast I co-host with Jason Neiffer, “The EdTech Situation Room” (@edtechSR), we record a Google Hangout most Wednesday nights from 9 – 10 pm central time. This video is live-streamed (via YouTube Live) and also archived as a video on our shared EdTechSR YouTube channel. For other audio podcasts, I generally record audio either:
- With a free iPhone app like Voice Record Pro, Ferrite Recording Studio, or iTalk Recorder.
- With a battery operated digital audio recorder like the Sony PS333.
If you record a webshow on YouTube Live / Google Hangouts that’s saved as a video, after the recording finishes encoding online you need to download it to a computer and convert it from a video file into an audio file. Here are those steps.
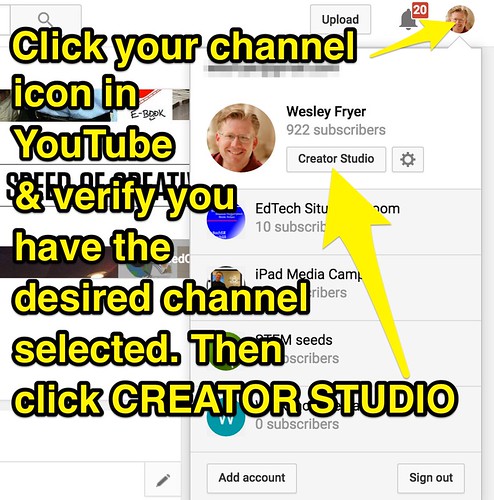
First, visit YouTube.com in a web browser and click on your icon in the upper right corner. Be sure it’s the channel to which you want to upload. Select the desired channel, then click on CREATOR STUDIO.
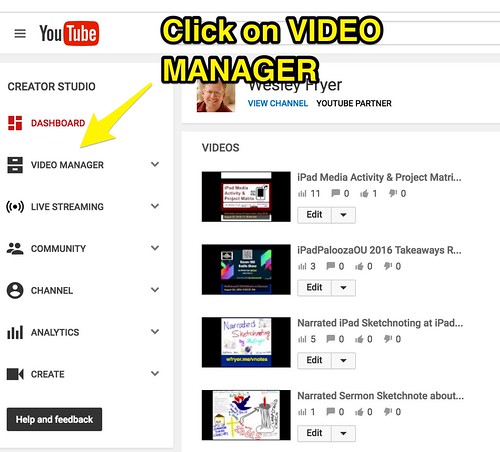
Second, in the left sidebar of Creator Studio webpage, click the VIDEO MANAGER link.
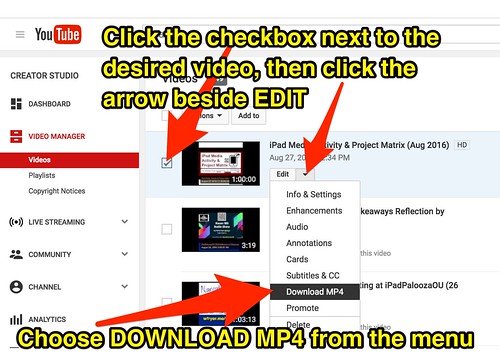
Third, find the video you want to download (the most recent should be at the top of the list) and click the arrow beside EDIT. (You don’t have to click the checkbox to the left of the video unless you’re going to use the batch actions menu at the top.) From the dropdown menu, choose DOWNLOAD MP4. The YouTube video should then download to your computer.
After the file finishes downloading, move it into an empty folder you’ll use for all the podcast resources for the episode you’re going to edit and publish.
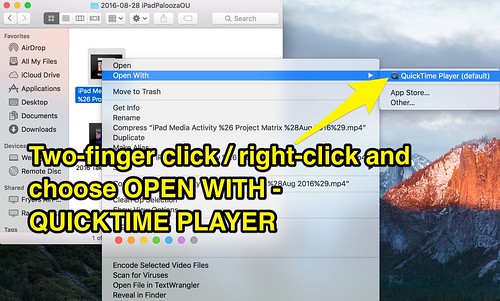
Finally, open the downloaded YouTube video file and open it in QuickTime Player software. Choose FILE – EXPORT – AUDIO ONLY to convert the MP4 video file into M4A audio.
If you use an iOS app or portable digital audio recorder to record podcast audio, use an app, AirDrop, a webpage interface, or a USB cable to transfer the audio file(s) for the episode into a new folder for show resources. Now you’re ready for step 2: Editing.
Editing
If your recorded podcast doesn’t need any editing, or you don’t want to take the time to edit, you can skip this step. This makes your episode a “no-edit podcast.” Many of the episodes on my secondary educational podcast channel, “Fuel for Educational Change Agents,” are no-edit podcasts. The recordings on the “Sounds of my World” website, which was inspired several years ago by Aussie educator Jess McCulloch, are also “no-edit” recordings.
Often, however, it’s important to edit podcast recordings to make them sound more professional. Intro and outro “bumpers” can be added, along with “stingers” which can separate show segments. I’ve used free, open source Audacity software for 99% of the podcasts I’ve created since 2005. It works on Apple as well as Windows computers, and supports editing of multi-track audio podcasts. After trimming clips, inserting bumpers, and ordering clips as desired, I export the final audio file as an uncompressed audio file.
If I’m going to normalize the audio in step 3 with Auphonic.com, I export in FLAC format. If I’m going to add meta information and compress the final file with iTunes software (and skip normalization) I export from Audacity in AIFF format. WAV format works as well. All three of these formats are uncompressed, which is important to preserve audio quality. If possible, you want to avoid compressing your audio files more than once.
Sometimes, if I want to speed up the workflow, I’ll export to MP3 directly from Audacity. To do this, you have to install the free LAME MP3 audio encoder. Links to LAME are available on the Audacity download site under “Optional installs.” While this works, I’ve found the audio quality and compression size iTunes and Auphonic.com provide are better than Audacity via LAME. When exporting an audio podcast with some bumper music, I prefer using 32 kbps at 22.050 kHz. Some podcasters export at higher bitrates, for higher quality, but I find 32 kpbs has acceptable quality with a much smaller file size for listener downloads.
Normalize & add meta info
Step 3 can be skipped like step 2, but it’s often important to normalize audio levels as well as add meta information. Normalization evens out the levels of the podcast recording, which can make a podcast recording much more understandable and enjoyable for the audience. Several years ago I used the free “Levellator software” from the Conversations Network, but it stopped being updated in 2012. It may still work with your current computer operating system. I discovered and started using Auphonic.com several years ago instead, since it not only can normalize audio but also add meta information and show art. It can also add intro and outro bumpers, which I’ve used previously with conference recordings to streamline that workflow. Auphonic does cost money, and they charge by the time length of your podcast shows you encode with them. Their servers process the files, so after uploading you have to wait a short time (like you do after uploading a large YouTube video file) for processing to finish.
If I don’t need or want to normalize a podcast episode, I open the uncompressed, exported file from Audacity directly in iTunes. It’s important to configure the “import settings” in iTunes preferences so new files are converted in MP3 format, and you choose the desired bitrate. If you encode/rip CD music audio files, be sure to change this back from your podcast setting, since music tracks sound pretty bad at 32 kbps. Apple has moved the setting for MP3 conversation in its recent Mac iTunes version. With the import setting changed to MP3, it used to be possible to right click/context click a file in iTunes and directly choose “CONVERT TO MP3” from the popup menu. Now, users must select a file to convert in the iTunes library, choose the FILE menu, then CONVERT, then CREATE MP3 VERSION.
After using either Auphonic.com or iTunes, you should have a final MP3 audio file which is ready to be renamed, uploaded, and shared online.
Publish
The last step in the podcasting process is uploading and publishing the file to a website and within an RSS feed. I use WordPress websites for my audio podcasts now, and mostly use the PodLove Podcast Publisher plugin for WordPress. It’s free. I also still use the free Blubrry PowerPress Podcasting plugin for WordPress on some sites as well. I also use the “Podlove Web Player” on 1 site, along with FeedForAll for Mac software to update the RSS feed. I use the free Feedburner service (now owned by Google) to share the links to my podcast subscription feeds.
I used to upload my podcast episodes directly to my web host for sharing, but a couple of years ago I tried the web host WPengine (which I later dropped for Site5.com) and WPengine did not host podcast files. Primarily for that reason, I migrated my podcast files to Amazon S3. This has proven very affordable and cost effective. If you are searching for a podcast file web host, you also should consider Libsyn and Podomatic.
After uploading the final audio mp3 file to the web, I make sure the file is shared PUBLICLY (so anyone can download it without a login) and link that file within a new blog post or WordPress “episode” post. Then I tweet the link, and I’m done!
I hope this detailed description of these podcast workflow options has been helpful to you, if you’ve read to the end of this post. This is actually a post I’ve owed Jason Kern (@jasonmkern) for seven months now! If you have questions or comments, please let me know!
@jasonmkern I had forgotten you were the person who asked me to share my podcasting workflow back in 2009 🙂 https://t.co/7XVRovAe60
— Wesley Fryer, Ph.D. ??? wesfryer.com/after (@wfryer) January 30, 2016


Comments
2 responses to “Audio Podcasting Workflows (August 2016)”
Is there any way to (1) create and (2) get a synchronised display of subtitles for audio podcasts?
There seems to be a forgotten advantage of video podcasts that it is relatively easy, although time-consuming to add subtitles to videos on YouTube.
Great article, Wesley! Thank you for posting screenshots with detailed instructions. Also, the part about podcast editing was extremely useful!