
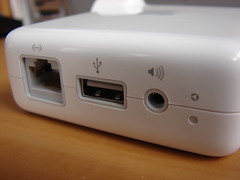
I’ve used H.323 videoconferencing units from home before, but since there tends to be long spaces of time between these configurations it seems I always have to “relearn” several things to get all the equipment working properly. I spent five years as a university director of distance learning working extensively with videoconferencing, and then used videoconferencing quite a bit for the two years I worked for AT&T as a regional “education advocate.” Even though I’m pretty familiar with videoconferencing lingo and the requirements, setups can still be time consuming. As with many technology issues, a single incorrect setting can be a point of complete failure when it comes to making two-way connections with audio and video. My old Linksys wireless router finally died about a year ago and I’ve been using an Apple Airport Express router (which I love) at home ever since. Because my Tandberg videoconferencing unit needs to plug directly into an Internet router, however, and the AirPort express doesn’t have a fixed port for other ethernet devices (it just provides WiFi access) today I picked up a new Netgear router at Radio Shack for $40.
It took me a few hours in all, but I finally got the Netgear router and my Tandberg unit configured not only for videoconferencing access but also secure WiFi and free content filtering via OpenDNS. In this post I’ll share the highlights of my configuration setup and a few lessons learned.
When you videoconference with a H.323 codec from a university, often the IT department is able to assign a static IP address which is always dedicated to a particular videoconferencing unit. That is generally the best scenario. After you’re connected to the network (usually with an ethernet cable rather than a wireless connection) you have to enter the following info into your videoconferencing unit:
- Local IP address (usually starts with 192 or 10.)
- Subnet mask
- Gateway or Router address
- DNS numbers
After the unit is online with the dedicated IP address, the IT department generally has to open up specific ports for videoconferencing in the firewall to permit both upstream and downstream audio as well as video. IP configurations can vary widely. Sometimes IT departments will assign a public IP address for a videoconferencing unit, but most don’t like to do that either for security reasons or because dedicated IP addresses can be hard to come by in some organizations. If you don’t assign a fixed IP address into the unit and use a local IP address, generally it is best to still have a global IP address “mapped” to your local static IP address so you can receive incoming videoconference calls from the outside world. If you don’t have a global IP address either mapped or entered into your unit, you generally have to dial out to make any type of videoconference connections. People can’t call you, but you can call them.
For a home-based videoconferencing setup over a high speed cable modem, like I have with Cox Cable of Oklahoma, the setup situation is a little different. My high speed Internet provider assigns dynamic IP addresses to customers, which means the address which someone would use to call me or my videoconferencing unit can change periodically. Just like a phone number, generally you want to have a consistent IP address which people can use to call you if needed. Because of this need, I used the services of DynDns to create a custom domain name which people can use to call me over H.323 video.
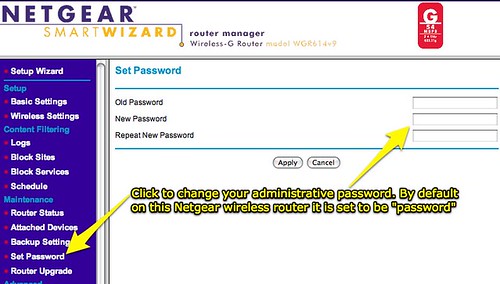
Before I explain those procedures, however, I should cover the basics. The first things I did when I configured my new Netgear home wireless router was to login to the router and change the administrative password from “password” to something more secure. It is less common today, I’ve noticed, but sometimes people will still simply plug in a wireless Internet router and not configure any security or change default admin settings. This can be a bad idea, if you have a neighbor that wants to play tricks on you.
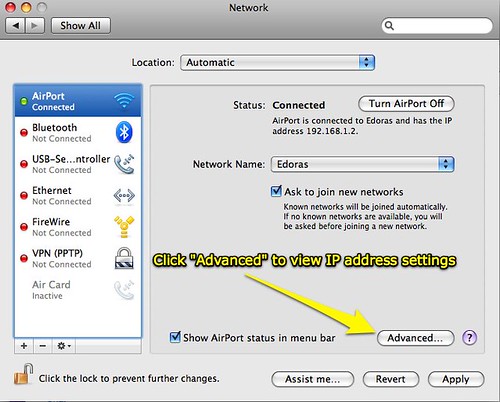
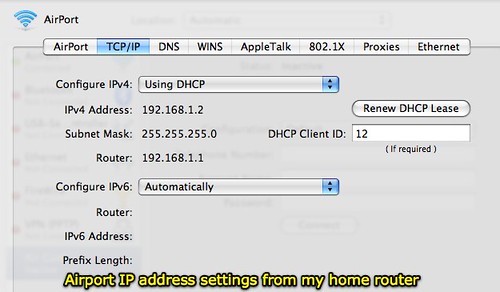
To log into the Netgear router, the instructions indicated I could use a web browser and link to the address www.routerlogin.net. Alternatively, the way I’ve logged into routers in the past is by looking at my IP address settings. These are viewable on a Mac (with OS 10.5.7) by selecting the Apple menu, System Preferences, Network, and then clicking the Advanced button.
On a Windows-based system, the easiest way I’ve found to view your IP settings is to click START – RUN, type CMD, then IPCONFIG/ALL. These command line commands can be lower case, they are not case-sensitive.
After logging into the router successfully, it is time to change the password. I really like the layout as well as responsiveness of the admin access pages for this Netgear router. It is much snappier and well-organized than the older Linksys I used to have. The option to change the admin password is in the left sidebar. As with all administrative changes to the router, a change must be made and then APPLIED to take effect. Some changes force the router to restart entirely, which takes a minute or two to complete.
After changing the admin password, I next opted to change my wireless network name as well as select a wireless security option with a password.
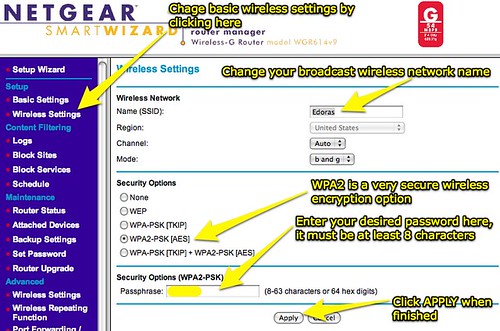
WPA2 is a very secure wireless protocol. WEP is not secure, and can be hacked (I’m told) in short order by folks who know lots more than I do about networking.
After securing the router with these two assigned passwords, I next setup a basic level of content filtering for all devices connecting to our home network. I was interested to see the Netgear router provides some basic options for content filtering, but these are not dynamic or likely very effective IMHO. You can block specific sites, keywords, and “services” by entering ports you want to block. You can also establish a “schedule” for blocking, I suppose so if you want certain things like chat accessible on the weekends but not during the weekdays. I don’t actually know anyone who uses this feature on a home router, but I suppose someone must.

Instead of using these rather weak and cumbersome content filtering options built into the router, I again opted to use the free content filtering services of OpenDNS which I’ve written about previously quite a bit. Of those posts, I’d commend “The Value of OpenDNS (free) content filtering at home,” “Reflections on home content filtering and OpenDNS after a year of use,” and “Setting up a basic content filter for free at granddaddy’s house” as good places to get more background about why I think OpenDNS is wonderful. Today to get our new home router setup with OpenDNS, I first clicked BASIC SETTINGS and changed the default DNS settings which the router used to those specified by OpenDNS.
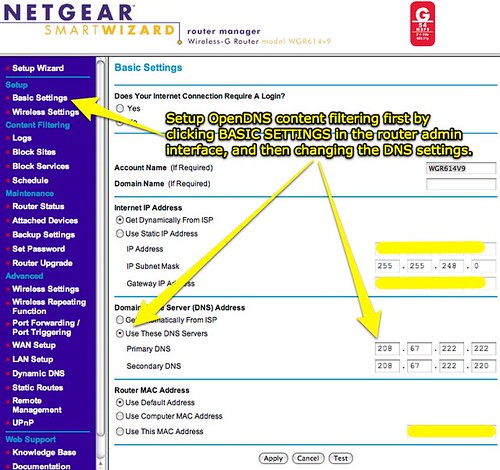
DNS numbers correspond to servers which maintain huge tables of IP addresses and domain names. When you type in “www.speedofcreativity.org” a DNS server converts that address into its related IP address, and then forwards your browser to the server with that IP address or hosting that IP address virtually. By changing the DNS numbers used by our home router AND configuring our free OpenDNS account to filter the types of content we want, all laptops, iPhones, iPod Touches, Wii gaming systems, XO Laptops, and other devices on our network become immediately content filtered with those same settings, WITHOUT any type of local configuration required on them. This is excellent and a good thing, in my view.
After getting content filtering setup via OpenDNS, I next worked on configuring my router to let my Tandberg videoconferencing unit work through it. The first thing I did was assign a static IP to my Tandberg which is outside the range of IP addresses dynamically given out by my home router. This took several steps.
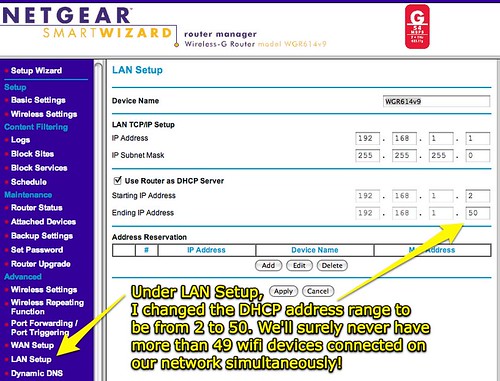
First, under LAN SETUP I changed the IP address range used for DHCP from “2 to 255” to “2 to 50.” DHCP is the protocol which assigns different devices that connect to your home network with their own IP address. I don’t think we’ll ever have more than 49 different WiFi devices at our house connected online simultaneously! (I certainly hope not!) By limiting the number of DHCP addresses which the router assigns, I can assign a static IP address outside that range and it will never be given to another device by the router. This makes the address “reserved” without having to actually enter it in the same window under “address reservation,” but the function is the same. I don’t want any other devices to get or use the IP address I’m giving to my videoconferencing unit.
The second step was assigning a static IP address to my videoconferencing unit. To do this, I first plugged in the unit to my router and let it “grab” a DYNAMIC address. I looked at those IP address settings (or I could have looked at them on my laptop too) and made a note of them. In the control panel of the videoconferencing unit, I assigned an IP address with a last number greater than 50, since that is the last address used with DHCP by my router. I chose 75. I used the same subnet mask and router/gateway address as the router provided with DHCP. I actually did enter different DNS numbers, because I wasn’t sure if my OpenDNS settings would affect videoconferencing or not. This shows how easy it actually is to bypass OpenDNS content filtering: Simply put different DNS numbers into your device and it will bypass the OpenDNS settings entirely. I don’t know if this was necessary, but while I was troubleshooting my connection I made that change.
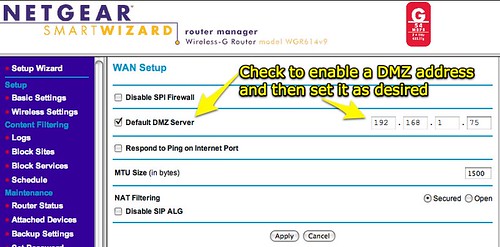
In order to let my videoconferencing unit “be visible” to others on the Internet, I could either setup “port forwarding” for the unit or simply put it in the “DMZ” of my network. Before I bought the Netgear router today, I actually checked to make sure it supported DMZ configurations. On the Netgear router administration page, the DMZ can be assigned by clicking the WAN Setup link in the left sidebar.
Now that all these configuration changes were made, everything SHOULD have “just worked.” Unfortunately, because of locations where I’ve used this videoconferencing unit previously and the settings they required, I ended up having to try out multiple different changes to my settings until I finally figured out that I had an old gatekeeper address in the videoconferencing unit, and also had the setting for NAT turned on. Once I changed those settings, I was able to connect successfully to some test endpoints which are maintained by both Polycom and Tandberg. (140.242.26.6 and 63.240.203.39, respectively.)
The last configuration change I wanted to make involved my dynamically assigned home IP address and DynDns. I first used and blogged about DynDNS back in December of 2004, and also mentioned it in my March 2005 post, “H.323 Videoconferencing from Mac OS X with oPhoneX.” By registering with DynDNS and entering my DynDNS credentials into my Netgear router, the DynDNS website will keep abreast of my dynamically assigned home IP address. This way, I can use my custom address “MYUSERID.dyndns.org” and anyone can videoconference with me at home using that address, even when my ACTUAL IP address assigned by my high speed Internet provider changes. Very cool!

The last thing I did was actually connect to my home videoconferencing unit with my DynDNS address, using another Internet connection outside my home. To do this, I connected to the AT&T 3G network using my cell phone USB data card and the free/open source H.323 videoconferencing program XMeeting. I was able to connect and share audio and video, so this confirmed everything in my configuration was working as advertised.
These steps probably seem cumbersome and complex to many, and I’ll readily admit that I didn’t remember all of these steps right away today as I was going through them. It is great, however, to now be setup with a faster, secure router and a flexible videoconferencing setup that I’ll hopefully be able to make extensive use of in the months ahead.
I currently have five different professional development programs listed with the Center for Interactive Learning and Collaboration (CILC) to share over video, and I can share sessions on other topics as desired/needed. Please schedule a session with me through the CILC if you’d like to setup PD in the coming school year over video. 🙂 Although I do love to travel from time to time, it’s quite convenient to use videoconferencing technologies for presentations, and it can be MUCH cheaper for schools than paying for a face-to-face speaker in person!
Technorati Tags:
dns, netgear, router, videoconference, videoconferencing, tandberg, cilc, configuration, dhcp, dyndns, firewall, home
If you enjoyed this post and found it useful, subscribe to Wes’ free newsletter. Check out Wes’ video tutorial library, “Playing with Media.” Information about more ways to learn with Dr. Wesley Fryer are available on wesfryer.com/after.